Friday 21 September 2018

The camera I nearly had and the one I did have. The Carl Braun GLORIA and PAXINA

We had thumbed the catalogue for weeks; the ‘we’ being my grandfather, my father and me. In the mid-1950s, Neville Brown & Co (NEBRO) produced a catalogue of the lines they sold*. in 1956, my grandfather fancied buying me the Gloria because it had an f/2.9 lens—probably the widest aperture on a (relatively) low-priced camera. Money was tight and it was either that with no ever-ready case or the cheaper Paxina with a case. Eventually, it was decided; a Gloria it was going to be. One Saturday morning we set off for Nottingham Photo Centre but when we arrived, there were no Glorias in stock. I left clutching a new Paxina in its box, the solid ever-ready case in another. So I never did get my hands on the Gloria—until I thought it would be fun to see what I had missed sixty years previously. I bought a good-looking Gloria on eBay and had it serviced by Ed Troszka before he gave up the business. It came back in beautiful condition. As well as cleaning the Prontor shutter he cleaned the rangefinder internally. I soon found a lens hood and filter mount plus a few filters of the correct size going for very little on eBay. I then put a couple of films through it to relive the dubious delights of 1950s photography.

The medium-format (we didn’t call it that then) Gloria and its cheaper sister Paxina were made by Carl Braun Camerawerk of Nuremberg. They produced the successful Paxette range and little-known Gloriette of 35 mm cameras as well as box cameras and a folder. From 1906 until the end of the Second World War, Carl Braun had produced parts for radios and binoculars. Like a number of other German manufacturers trying to get re-established after the War they entered the camera market in 1948 with their box cameras. The demand for German cameras was enormous in the late 1940s and 50s but the more expensive ones like Rollei, Leica and Zeiss Contax could not be imported into Britain because of currency restrictions. Cheaper models, however, could get in but even then Purchase Tax of about 30% or more was added. Nevertheless, there was an opening for cheaper cameras from first tier manufacturers (Zeiss), second tier (Agfa) and the new third tier manufacturers, like Carl Braun, to get a foothold in the British, Commonwealth as well as the US and world markets.

It  should not be imagined these cheaper cameras were cheap. The Paxina 29 (named for its f/2.9 lens) with the Prontor-SVS shutter was 17 guineas (including tax) or £379 in 2018 prices, the Gloria about 12% more. That was big money in 1956. The cameras were 3 guineas cheaper with the Pronto 4-speed shutter.

These medium-format cameras taking 120 roll film had, in common with some other simpler models, one key feature. The lens/shutter assembly was held at the correct distance from the film plane by a metal tube that was either spring-loaded (Gloria) or manually pulled (Paxina) from the body. Other manufacturers like Zeiss and Agfa had stuck with a fold-down arrangement of struts and bellows. The resulting folding camera was flatter in profile for carrying but relied on the struts holding the lens parallel to the film and on the bellows not leaking light. One of the reasons my grandfather, brought up with folding cameras in the very early decades of the 20th Century, was so keen on the Braun cameras was that bellows did deteriorate and light leaks could be a problem. That design of the ‘tube’ camera makes one more attractive to people who want to use these cameras in the 2010s. With the Zeiss Nettars, Ikontas etc and the Agfa Isolettes there is always the state of the old bellows to worry about.

According to McKeown, the Gloria was made between 1954 and 1957, the Paxina 29 between circa 1953 and 1957. There were earlier Paxina models, made from about 1950.

The lenses were incredibly fast for their time, especially on a medium-format camera. The Gloria I have has a Praxar 75 mm f2/9. Both Praxar and Praxanar lenses are shown as having been fitted to the Gloria in Mckeown’s guide. The Paxina is said to have been fitted with a Praxar or Steiner but mine has a Praxanar.  These lenses are triplets and have some form of coating. All the lenses were made by Steiner-Optik GmbH of Bayreuth, still in business as makers of binoculars.
As with most other than top-range cameras of the time, hoods and filter holders were a push fit. The problem was that when fitted they obscure the scale on the focusing ring.

Paxina 29 - tube in the closed position
The Gloria has several features the Paxina 29 lacks. The first was a non-coupled rangefinder, a good coincidence rangefinder with a coloured second image. The second was a body release (the shutter release on the Paxina 29 is on the lens/shutter assembly). The third is a double-exposure prevention device that comes along with the body release. The fourth is a spring-loaded tube to extend the lens to the taking position (the tube has to be pulled out manually and locked in the Paxina).

As for performance, these lenses were thought of originally as of rather low contrast compared to the cameras with the more expensive Tessar-type lenses. It is difficult to say how they compare now with the competition then in terms of contrast and sharpness because coatings etc may have deteriorated.

Using the Gloria reminded me of how slow the whole process was even though, and ignoring flash photography, there were only aperture, shutter speed and focus to set before cocking the shutter, pressing the release and remembering to wind the film on. An extra step could involve fitting filters and a lens hood after setting the focus and not moving the ring while doing so.

The lens at its extreme - f/2.9
FP4+/Rodinal, negative scanned, processed in Lightroom

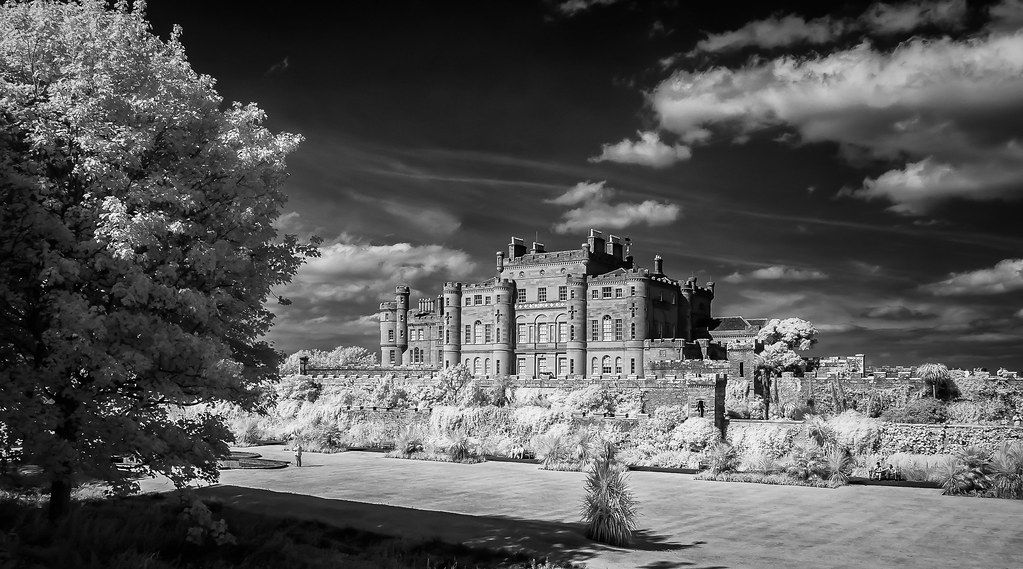
Alloway Auld Kirk - on a dull day

The only problem I had was seeing the numbers on the film backing through the red window. The modern film I was using all had the same backing paper, with the numbers and arrows printed in a light shade of grey. That’s when I missed the automatically determined wind-on of a Rollei.

These cameras had no means of attaching a strap and every-ready cases (‘never ready’) are a pain with flaps getting in the way and the camera having to be removed completely to change the film.

One advantage of these cameras over a single- or twin-lens reflex is that they can fit into a large pocket although they are not so flat as a typical folding camera from that era.

I enjoyed using the Gloria with my iPhone as exposure meter—for a short period, but it is time for somebody else to enjoy the pleasure.

Finally, how long did I keep the Paxina I was bought in 1956. Not very long—but that’s another story.

I have made a short video on the Goria and Paxina:


*Inside Gloria and Paxina cameras sold in Britain can be found a sticker recommending Ferrania film. NEBRO were the agents for Ferrania as well as Carl Braun of Nuremberg.

Tuesday 28 August 2018

Camcorders: An unplanned change from Sony FDR-AX53 to Panasonic HC-VXF1

After using my Sony AX33 for several years in the wild, I was frustrated by the limited focal length compared with the later model, the AX53. After putting off a decision in the expectation that Sony would soon replace the AX53 (first on sale in 2016) I finally bought, from Amazon, the AX53 in May, a few weeks before a long trip. I was very pleased, as with the AX33, with the video quality. However, the longer maximum focal length came with what seemed to be more movement of the optical stabilisation system (BOSS) before settling down and a difference in the way the autofocus seemed to operate. Objects in the centre of the viewfinder only a little darker than the surroundings were sometimes ignored while higher contrast objects in the background were brought into focus; this was particularly evident in low light, but not exclusively so. The old annoyance of the electronic viewfinder in the AX33 was still there—no control over brightness. However, no camera is perfect for every job thrown at it and it did a very good job in terms of quality of output, on land, sea and air.

A fellow traveller had a new Panasonic camcorder (VXF1) and asked me to take some footage with her in it. The controls were virtually identical but I was impressed by the ergonomics of the viewfinder display, the speed and accuracy of autofocus and the stabilisation. Overall, I liked its handling a little more than my Sony.

After I had edited and stored the footage, I was clearing the cards when suddenly the Sony failed to start up. A camcorder logo appeared on the screen and I could hear the  sound of a motor near the front but then nothing. I did all the usual checks (battery out for half an hour, tried the mains adapter etc) but still nothing. The camcorder was dead—an ex-camcorder. Having struggled to find what to do with a broken-down Sony camcorder still within warranty, I decided to contact Amazon support. After a quick web-chat, the excellent assistant realised that it was a hardware failure and within minutes had sent me labels for it to be picked up by courier the next day for a full refund (it was outside the period for a normal return). The offending AX53 was soon back in its box and on its way.

Thinking back this was my second camcorder to die. The first was an early 1990s Sony Hi8. With that one I was lucky. I had just used it to play the last of my stored Hi8 video tapes onto a dvd, I think it was, via a PC, when it too refused to start. That was in the days when there were were magazines dedicated to camcorders and pages and pages dealing with the then common hardware failures.

How was I going to replace the Sony AX53; like-for-like or go for something different? Remembering the Panasonic VXF1, I started to look up reviews. However, I found surprisingly few. Camcorders are completely out of favour to capture video and new models do not get the coverage they once had. Nevertheless, the few reviews that have been written or shown on YouTube did prefer the newer VXF1 over the Sony AX53. I was also rather reluctant to trust another AX53; once bitten twice shy.

I should explain again that I prefer a camcorder with a small sensor. Unlike a film maker seeking narrow depth-of-field, I need a wider depth of field for wildlife that is often being filmed at maximum range and maximum aperture, and is often surrounded by vegetation. Much as I would like to carry a camera/camcorder with a larger sensor as well, for those other shots, there is only so much my back will carry. Better to get a small bird in focus, even if some of the background is also sharp, than get a fuzzy bird, is my motto. I should also explain that I prefer the ergonomics of a camcorder to that of a stills/video camera. I find I can hold a camcorder still for longer using one hand and arm locked into position than I can a conventional slr-style or ‘compact’ camera. I also do not have to think about using an external microphone since the for most of my purposes the built-in microphones for ambient sound are fine.

I decided to go with the 2018 Panasonic VXF1 rather than the 2016 Sony AX53 again, even though I had to re-equip with spare batteries and it was more expensive. I have done some trials. Video (4K) is excellent. The lens seems a little better especially the edge definition. I checked that the sharp video is not the result of oversharpening. Focus seems faster. The stabilisation system does not go wandering off all by itself. The viewfinder is better. The menu system is far superior to the Sony. There are programmable function buttons. The viewfinder is supplied with a rubber hood. The level indicator works well. It has infrared night vision (which I sometimes use and which once differentiated Sony from the competition). I was also surprised by the build quality. In my long line of camcorders starting with Hi8, I have had one previous Panasonic; the build quality of that was not impressive. My overall impression is that it is as if Pansonic looked at all the annoying features of the Sony and tried to come up with something better, even if a little more expensive.


Of course there are features I would like that aren’t there (a log profile video option, 50(60) fps 4K, GPS); but, my verdict on the Panasonic VXF1: so far so good.

Out goes the failed Sony AX53
In comes the Panasonic VXF1


Saturday 18 August 2018

Variable Neutral Density Filters: Why are they not calibrated for photography or videography?

Variable neutral density filters are useful for video or time-lapse work. However, they are infuriating—as I pointed out in my review here—because they are not calibrated in stops or Exposure Values (EVs). Instead, all that I have found for sale have a linear scale corresponding to the change of angle of rotation.

Here is the scale on a variable neutral density filter made by Gobe:


Variable neutral density filters comprise two sheets of polaroid material, one rotating on top of the other. When the angle of polarisation of one sheet is identical to that of the other, there is no reduction in the amount of light passing through (other than the basic reduction caused by the material itself). As the angle is increased up to 90 degrees, the amount of light transmitted is decreased until, with two ideal polarisers, no light is transmitted at all. Although polaroid material is not an ideal in terms of a perfect optical polarising material, it does follow pretty well the Law of Malus. The intensity of light transmitted by the filter can be calculated from the angle of rotation of one sheet with respect to the other. I have actually checked experimentally using an ordinary cheap variable neutral density filter (i.e. made of polaroid material) that there is close agreement between the actual curve of intensity against angle of rotation and the theoretical curve calculated from the Law of Malus.

The problem for photographers is that we do not work with a linear scale of light intensity. We work with stops or Exposure Values, a base-2 logarithmic scale. In other words, halving the light intensity is 1 EV (stop) difference; halve it again, 2EV differences and so on. If we look at the graph calculated from the Law of Malus, we can see that the angle of rotation between the two polaroid sheets needs to reach approximately 45 degrees for the light intensity to be reduced by half, i.e. 1 EV or stop. With a scale of say 14 steps on the rim of the variable ND filter, we have to get to number 7 just to get a 1 stop reduction in light transmitted over and above that caused by the material itself. Minus 2 EVs is reached at 60 degrees but then smaller and smaller changes in angle are needed to achieve a change in EV.

This diagram shows the reduction in transmitted intensity with change of rotational angle (calculated from the Law of Malus). Also shown are where changes in EV fall on the line.


So we know that moving the rotation by one point at one end of the scale does not have the same effect as rotating the upper layer by one point at the other end of the scale. Quite simply the photographer does not know which graduation to use to achieve a reduction of light transmission by, say, 4 EVs or stops.

This graph shows the calibration of a variable neutral density filter in photographic terms, i.e. in stops or EVs. This one (made by Gobe has a scale marked with 14 points together with ‘min’ and ‘max’ marked as bands placed non-linearly:

This graph shows the effect of the setting on the rim of a Gobe variable neutral density filter
on the decrease in Exposure Value (EV) (stops). EVs were measured to the nearest 1/3rd
of a stop. A was the arrow on the side of the 'Max' mark nearest the scale. The graph
serves as a calibration curve for the filter.


My simple question is: why do manufacturers of variable neutral density filters not calibrate their filters with decrease in EV? Is it because the calibrations would all be close together on the rim? Or that it would be difficult to engrave a marking that sits precisely on an EV difference? In that case simple markings for, say, 5 or 6 EVs should not be too difficult even if only one or two of the marks had values attached. Or have manufacturers not done so because variable neutral density filters were traditionally marked by and physicists, with the graduations indicating simply the change in rotation? The very least manufacturers could do would be start the markings at a point where there is a decrease of 1 EV beyond the basic decrease (of approximately 2 stops) produced by having the filter in place.

There is actually plenty of room on the rim for two scales. Since the rotational angles cover 0-90 degrees, there is the rest of the rim on which EVs could be marked.

I wondered if more expensive filters had markings in EV. It would appear not. I found the instructions for Tiffen:

The Tiffen Variable ND filter operates on the same principle as a Circular Polarizer [erm, no it doesn’t] – rotate until you reach your desired effect and shoot. It allows you to have continuous control over the amount of light coming through your lens in an approximate range of 2 (ND 0.6) to 8 (ND 2.4) stops – while maintaining the integrity of your image. Note: The evenly spaced indexing marks between MIN and MAX do not represent calibrated stops. They are for reference only, to be used as a density bench-mark to return to a previous setting.

What would a variable ND filter look like when calibrated for photographic use? Here is the same photograph as above but the upper one this time has marks added in Photoshop to indicate a scale marked in EVs:


A big improvement, I would submit.

Tuesday 20 March 2018

Panasonic Lumix DC-FZ82: Wildlife video at extreme range

Readers of my previous post on the Lumix FZ82 bridge camera will know that it is a mixed bag. Some features I like; some desirable features are missing; implementation of some features is poor. However, I have it for its very long focal length. With 4K video the 25 mm equivalent maximum focal length is 1,680 mm.

On the Tibetan Plateau in Sichuan, China, last November I used it to take videos of Blue Sheep a very long way away on an alpine meadow and of Pallas’s Cats also a long way away. I had the camera mounted on a Manfrotto Befree Live Video tripod. The wind was strong and gusting and even the crumbly soil (undermined by Plateau Pikas) caused a wobble. I could have done with having the tripod at minimum height but the camera does has not have a moveable screen!

At maximum focal length shimmer caused by warmed air rising is always a problem that nothing can be done about.

The footage is 4K. I was outputting at 1080 so could scale up by a factor of two if necessary, i.e. to the equivalent of about 3,500 mm. Yes, on a full-frame 35 mm camera and a non-telephoto design, that’s a lens 3½ metres or 11½ feet long.

Here are some examples:


Video at these extremes and under such conditions is like the dog that talked with a Birmingham accent. The remarkable thing is not the accent but the fact that it could talk at all.

I also used the camera at a long focal length to take close shots of a Plateau Pika. The distance—and, therefore, shimmer—was much less evident.

These are the full versions of the videos on Youtube (most of the footage is from my Sony AX33):


Is there a non-professional and light camera that in the conditions could have done better?


Thursday 22 February 2018

My current processing workflow for black-and-white infrared photography

I now have a standard protocol (workflow) for producing black-and-white images from my infrared-converted cameras. It is very simple and allows adjustments and corrections at all stages.

In Lightroom Classic, in Basic, I select Black & White then Auto Tone. Then I take the image to Silver EfexPro2. I usually use the preset High Structure Smooth or High Structure Harsh. Then, after making adjustments, I go back to Lightroom to make further general or local adjustments to finish the job, usually leaving noise reduction and sharpening until the end.

Those simple steps suit Raw images from my converted Nikon D80 with a 590 nm filter and my Nikon D7100 with 720 nm filter, or either camera with an 850 nm filter over the lens.

Here, as they say, is one I made earlier:


Culzean Castle

Sunday 18 February 2018

Infrared Processing in Macphun (Skylum) Luminar 2018

For those photographers not locked into/who don't like the business model/who can't afford the Adobe Lightroom/Photoshop environment, choices for processing images taken with an infrared converted camera have been limited. However, I saw that Macphun's (now Skylum) Luminar 2018 has a Channel Mixer and have been trying it out.

I should also point out that another rival system out there, DXO Photolab also has what they call a channel mixer in its optional extra, FilmPack 5. However, this is for changing the amount of the various channels in a conversion to black-and-white. It cannot be used for faux colour infrared conversion.

The Luminar Channel Mixer 'Filter'
In Luminar, the Channel Mixer works fine and in the same manner to that in Photoshop. For a newcomer to infrared, there is the added advantage that everything can be done to complete the image in this one app. The same cannot be said for Lightroom where a trip to Photoshop (or indeed to Luminar as a plug-in) is required.

A set of presets (which includes a channel mixer stage for faux colours and various black-and-white options) has recently been made available by Laurie Klein Photography for $9.95. I have tried them and they might produce a reasonable starting point for some people but I would find it just as easy to build my own presets using settings for Photoshop devised by Bob Vishneski (see my post of 12 June 2017). The problem with somebody else's presets for infrared is that what you get depends on the filter/sensor combination is in the converted camera.

One slight criticism of Luminar is that when things start getting complicated with lots of filters applied, there is a really noticeable lag from moving a slider to seeing the result appear on screen. That may be a property of my now old Mac but I do not have that problem in Lightroom and/or Photoshop.

For those looking for a different or much cheaper option for faux colour infrared images, Luminar 2018 has a lot to offer.