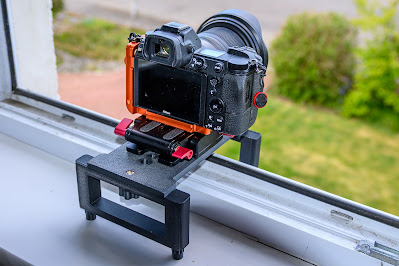
There are times when a tripod is utterly useless. One of them is when trying to make wide-angle time-lapse videos from an open window. You simply cannot get close enough since the lens of the camera has to be virtually outside the room. Over the years I have built all sorts of devices to hold cameras, from the size of GoPros to full-frame cameras and camcorders. Having rejected several commercial designs as being unsuitable since they were not tall enough to span a window frame and having lashed up several using other materials I designed and built one soon after buying a 3D-printer last year.
My criteria were:
- Stability
- Adjustable height legs for levelling
- Suitable for virtually any camera
- Ability to connect a variety of mounts e.g ball head, video head, GoPro, phone holder
- Portable and easily assembled
- Any metal parts to be easily available and/or standard photographic sizes
I opted for four feet which provide stability over a wide area, Hence the term QUADRAPOD. Since this is one of several types I have made this is my WINDOW QUADRAPOD which can also be used as a TABLE POD.
The photograph below shows the design I came up with sitting in an open upstairs window. The key point is that it enables wide-angle views (with focal length lenses of, for example, the full-frame equivalent of 11 mm in my GoPro) since the front of the lens can be positioned virtually level with the line of the external wall. Stability and levelling can be achieved by virtue of its four adjustable feet. Two feet are attached to each leg which are in turn attached to a plate. The plate has holes of two sizes for standard tripod screws of both ¼-20 and ⅜-16. All the parts are 3D-printed in matt black PLA. The only other parts needed are stainless steel bolts and metal threaded heat inserts.
The version shown has legs of different heights since the window cills are lower than the internal window ledge. However, I have made sufficient short and long legs to enable a flexible setup, depending on the difference in level between inside and outside, and also for use as a Table Pod.
The photographs with explanatory captions show how different cameras on different sorts of attachments can be mounted.
 |
Window Quadrapod with Nikon Z7 and 14-30 mm f/4 lens
on Neewer Lex Tilt Head |
 |
| ...or on a ball head |
 |
| With iPhone on Peak Design mount |
 |
| with GoPro Hero 10 |
 |
| From below |
 |
| Table Mode - with two short legs |
 |
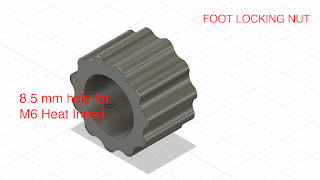
| Adjustable feet with locking nut |
 |
METALWARE ITEMS
M6 30 mm Bolt (2 per leg). On Amazon UK as M6 x 30mm Thread 304 Stainless Steel Hex Socket Head Cap Screw Bolt DIN912
M6 16mm Bolt (2 required), On Amazon as M6 (5 x 16 mm) Hex Set Screw (Fully Threaded Bolt)
M6 Heat Insert (9 mm o.d; 7 mm long). 2 Required for leg attachment bolts
M6 Heat Insert (9 mm o.d.; 8 mm long). 4 Required
Standard Photographic Tripod Screw ¼-20 Head o.d. 12 mm. Shank including thread 11 mm
Standard Photographic Tripod Head Attachment Screw. ⅜-16 Head o.d. 12 mm. Shank including thread 13 mm
|
 |
Leg Bolt Assembled (requires Superglue Gel or Expoxy)
and Foot Locking Nut |
A number of the attachments I use have built-in bubble levels. I could easily have incorporated one into the surface of the plate but could not decide an optimum position since different attachments cover different parts of the plate. If needed a separate bubble level can simply be placed on the plate.
For transport in a bag, the legs are simply detached and the bolts screwed back into the holes at the end of the plate.
For extra security, a cord can be tied from one of the holes in the plate to a piece of furniture in the room. Making sure the open window cannot close on to the assembly is also a wise precaution.
I also 3-D printed a box to hold the various parts and accessories on internal trays:
How to Build Your Own
You can download stl files from Google Drive HERE. I used a Bambu Labs A1 3D-printer.
A few explanatory drawings:


