Thursday, 25 October 2012

Rondinax and Rondix: Daylight Developing Tanks


It is often forgotten that it was — and still is — possible to develop films without having to use a darkroom or changing bag. Most developing tanks sold in the UK had to be loaded in the dark, a process often accompanied by curses as the film jammed or buckled in the reel or chinks of light were spotted around the shutters that were used to cover the windows of a temporary darkroom.

I was given my first developing tank by a great-uncle who had bought it in the 1930s. This Agfa Rondinax 60 was for 120/620 films and I used it for black-and-white films until the 1990s. The Rondinax 60 was a brilliantly designed and constructed but simple daylight tank. No darkroom was necessary. It was also extremely economical to use because the volumes of developer and fixer needed were small. Rondinax 60s, to judge by the prices they reach on eBay, are still a popular purchase for those still using 120 back-and-white film. The only disadvantage was that the spiral had to be rotated continuously (with the recommended short, jerky movements) during developing, rinsing (stop bath) and fixing. However, I see somebody has arranged a motor drive to automate the turning (which I think goes a little too quickly) and a video of it in action is on Youtube:


Instructions for the Rondinax 60 can be found at: 

http://www.urmonas.net/manuals/rondinax/rondinax.html


The 35 mm equivalent was the Rondinax 35 U, also marketed by Leica as the Leitz Rondinax 35, particularly in the USA. Both these tanks had black plastic spirals. The film was dragged onto the spiral by a belt of ‘American cloth’ (rubber-coated cloth) along a plastic film guide. The rubber on the cloth perishes with age but the fabric without the rubber continued to work well for me.

The Rondinax 35 had a stablemate, the Rondix 35, which worked without a spiral and again entirely in daylight. Photographs of the tank are are at:

http://www.l-camera-forum.com/leica-wiki.en/index.php/Rondix


The Rondix is far less well known than the Rondinax but was much cheaper to buy. My grandfather bought one around 1957 and, again, I used it until the late 1990s. In this tank, the end of the film is attached to a small central drum and the film wound into the tank from the cassette until the entire film is tight on the drum and resistance is felt on the winding handle. Then the handle is reversed so that the film turns back on itself to become wound on the drum in the opposite direction. When resistance is felt again, the direction is reversed, and so on until developing and fixing are complete.

The film, therefore, sloshes around in the developer/fixer and is never in contact with another loop of film for more than a few seconds at most. I have made a quick diagram to show the principle.


How the Rondix 35 Developing Tank Works without a spiral


Instructions for the Rondix 35 are at:

http://www.sandham.com/?path=Agfa_Rondix.htm%3f


The Rondix 35 was clearly not so popular as the Rondinax 35 (and neither as popular as the cheaper, vertical tanks that needed to be loaded in the dark). We wondered then whether people thought the film, not being held on a spiral, would be more likely to get scratched but we never found that to be the case. In fact, the Rondix tank and filtered developer produced some of the cleanest negatives I ever produced.

I had several Agfa Karat cameras which used special cassettes for cut lengths of 35 mm film. The film passed from cassette to cassette as in a roll film camera but without the backing paper. I thought the Rondix could not be used because the end of the film was not held in the cassette. However, I see in the more recent instructions that Agfa Rapid cassettes could be used (again, the film was not held). In this case one is instructed to do so many turns to the left and then so many turns to the right, and so on, in order not to pull the entire film into the tank. I would not liked to have risked losing count.

Only two sizes of Rondinax/Rondix tank were produced: for 120/620 and 35 mm film. The significant omission is, of course, 127 and for that size, a darkroom-loading, vertical, ‘universal’ type of tank was needed. I had a Rolleiflex 4 x 4 in the early to mid-1960s and black-and-white processing had to wait for a visit to the darkroom. I had been spoilt by the Rondinax 60 and the Rondix. Daylight-loading 127 tanks were made by an Austrian firm before the second world war and imported after the war but I never saw one advertised.

I never tried reversal processing in these tanks. There was no transparent spiral in the Rondinax 60 to allow exposure to light. Reversal processing may have been possible in the Rondix if a glass or transparent sheet had been held over the film in place of the lid. Turning the handle (with water in the tank) so that light reached the whole film may have done the trick. Again, I did not risk it. The Polly-Max tank I used for 127 films was used for reversal processing of Ferraniacolor.

Informative websites on the history of these tanks are:

http://www.summilux.net/labo/rondinax/
http://www.photomemorabilia.co.uk/Paterson/Developing_Tanks/Tank_History.html


Post second world war copies of the Rondinax 35 (the ‘Essex’ and 60 (the ‘Kent’ were made in a collaboration between Johnsons of Hendon and Neville Brown (NEBRO) in the early 1950s, presumably from designs and patents confiscated by the allies. I have never seen one and the advertisements must have been before my time. By 1955, Agfa was in full flow advertising the Rondinax 35U and the 60 as the advertisement from the BJ Alamanac for 1956 shows (the BJ Almanac for a particular year appeared, as I recall, in the preceding autumn). I think the Rondix 35 appeared the next year.


Thursday, 18 October 2012

Canon Powershot SX50: A Zoom War?

The announcement of the new Canon SX50 will be exciting to birders and other wildlife photographers. The zoom extends to the 35 mm equivelent of 1200 mm with image stabilisation of 4.5 stops. This is longer than the Nikon P510 I have (1000 mm).

So what's the difference on paper and the theoretical advantages/disadvantages of the two cameras.

Optical Zoom range: P510 24-1000; SX50 24-1200. Apparent advantage to Canon - but see below; Advantage to Canon for video
Maximum aperture: P510 f3-5.9; SX50 f3.4-6.5. Small advantage to Nikon
Sensor Size: P510 1/2.3 in; SX50 1/2.3 in
Resolution: P510 16.1 MPixels; SX50 12.1 MPixels. See discussion below
Size of output: P510 4608 x 3456; SX50 4000 x 3000 pixels. See discussion below
Stabilisation: P510 4 stops; SX50 4.5 stops. Small advantage to Canon
Output: P510 JPEG; SX50 RAW and JPG. Definite advantage to Canon
Weight: P510 555 g; SX50 595 g. Advantage to Nikon

With fewer pixels on the same size sensor, the Canon HX50 should be better in low light with regard to the control of noise than the Nikon. The e-Photozine review says fine to 3200 ASA. So, with respect to noise and low-light photography, the Canon is at an advantage.

In terms of the maximum zoom, the Canon's apparent advantage for still photography is not so clear cut. If the P510's output is enlarged digitally to effectively reduce the resolution to that of the SX50, then the equivalent focal length that can be reached is 1152 mm (the crude calculation is (4608/4000) x 1000). The advantage of the greater focal length is virtually wiped out. For HD video though, the Canon's longer zoom is a definite advantage.

Today, the Canon HX50 is £412 on Amazon.co.uk; the Nikon P510 is £283. Is the advantage of the 1200 mm equivalent lens for video (which is virtually wiped out for stills when resolution is taken into account), RAW output and probably better performance in low light worth the extra money? A hard decision for a new buyer because the only thing I miss on the P510 is RAW.

Will Nikon respond in the battle to keep the wildlife photographer who does not want to lug an SLR by launching a new version with the same resolution, improved control of noise, RAW output and a lens with a focal length greater than 1000 mm equivalent?

Panasonic seem to be going nowhere in this arms race; their latest 'bridge' (awful term) camera (DMC-FZ200) only extends to 600 mm, way off the pace for bird photographers and recorders, despite Amateur Photographer recommending it, for those who want to try their hand at wildlife photography... (29 September 2012). By contrast, the marketeers within Nikon and Canon do at least appear to know what wildlife folks want.

Thursday, 11 October 2012

Ferraniacolor Slides: The Wrong Sort of Water

Conversation on a train:

I have found some old colour slides but they have what look like burst blisters all over them.

Was your father a keen amaateur photographer?

Yes, he processed his own.

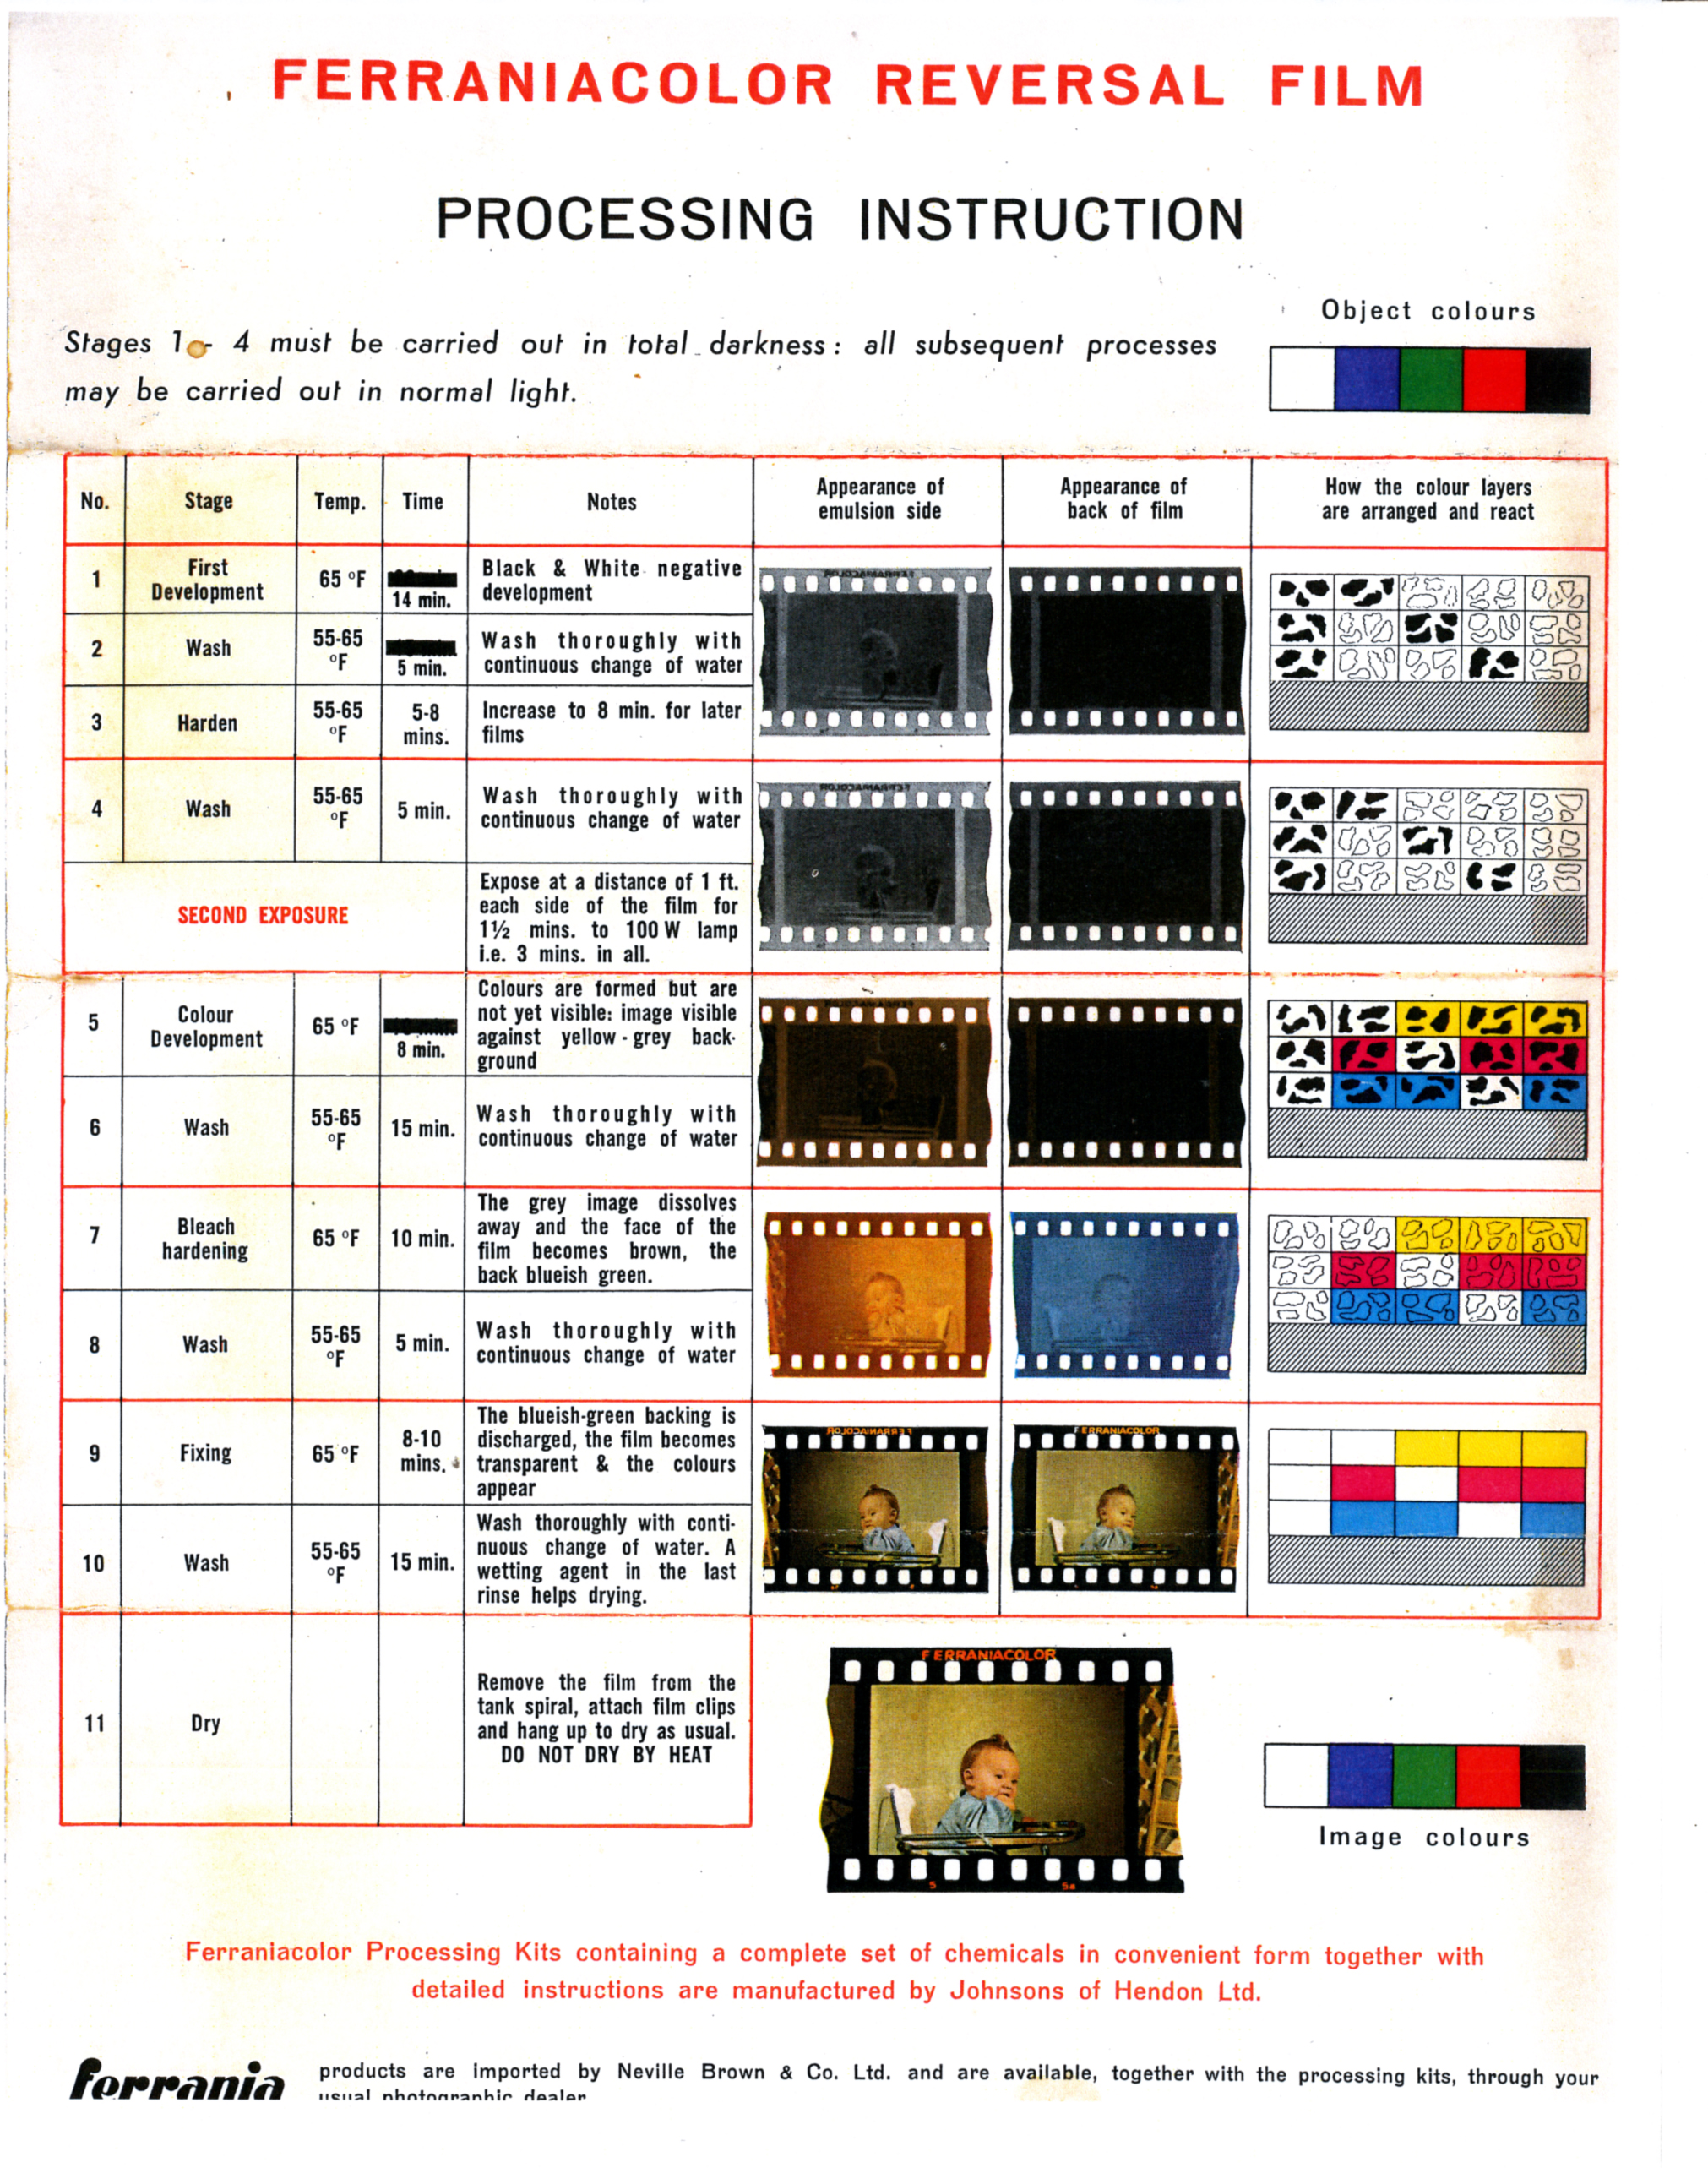
And therein lies the problem. The slides were Ferraniacolor, an old reversal colour film that was extremely popular in the 1950s. Processing kits made by Johnsons of Hendon were sold that enabled the production of very good slides on the day of taking. That was a great advantage compared to Kodachrome or Ilford Colour which had to be sent away in the post to a central processor. But there was a problem. The kit worked fine in hard-water areas. Included in the instructions, however, was the statement that in soft-water areas, an additional step should be included: a 2% magnesium sulphate solution bath after the colour development stage. There was no definition of what was considered to be soft water and no magnesium sulphate (epsom salts) was provided. Therefore, our and am sure many first efforts at processing Ferraniacolor ended in tears, for the emulsion blistered and burst in places. Once we realised that the water was not hard enough, epsom salts came out of the cupboard (most houses had a packet as a laxative) and the problem disappeared. Since the additional magnesium sulphate bath made no difference in hard water areas, since the stuff is cheap and since the bath was for only a short time, I could never see why Johnsons did not include it in their kit and standard processing instructions. I am sure they lost many customers disappointed by their first and perhaps subsequent efforts if they did not realise that their water was not hard enough.

It was especially galling to have this problem when we did not live in an area with what would be described as 'soft' drinking water. Modern maps show it to be moderately hard. Nothing like London tap water or the water from artesian wells in Cambridgeshire but nevertheless on the hard side.

We threw away most of the blistered Ferraniacolor transparencies many years ago, keeping only a couple that could not be replaced. Below is the detail from one showing the blistering:


Incidentally, the popularity of processing Ferraniacolor was such that manufacturers began making film transparent processing spirals. The film was left on the spiral when it was exposed to light as part of the reversal process. Photoflood lamps (later ordinary 100 watt light bulbs) were used for the exposure with the film spiral held and turned over in a bowl of water to prevent the film from overheating. I had a Polly-Max tank made by Johnsons and introduced in 1955.

With hindsight, I wish I had just used Kodachrome for 35 mm slides. The transparencies have stored extremely well and produce good scans. Unfortunately, Agfa CT18 became popular and we have lots of CT18 transparencies. They have also stored well but the grain, as somebody said, is like footballs.

Short processing instructions for Ferraniacolor are shown at:
http://www.brianpritchard.com/Ferrania%20Reversal%20Processing.jpg

Tuesday, 25 September 2012

Black and White Film: Reversal Processing

A query from a reader in Amateur Photographer brought back memories of black-and-white reversal processing in the 1950s and 1960s. The reader, who described himself as a technophobe, was asking about the discontinued Agfa Scala and the still-available Fomapan reversal films. Clearly the readers is not a techophobe if he wants to make black-and-white slides or filmstrips by reversal processing but a neophobe. 'Wet' processing is far more technically involved than using a digital camera.

In the Silverprint website, Foma reversal processing kits are available along with the instructions. Also shown is the Ilford Application Sheet from 2003, Reversal Processing Using Ilford Black & White Films to Make Monochrome Transparencies. This Ilford sheet shows the use of potassium permanganate and concentrated sulphuric acid as the bleach bath. Concentrated or even dilute sulphuric acid is not pleasant to have around the house. I remembered that I had reversal processed Ilford FP3 and Pan F to make slides in the 1950s/early 1960s and that I had not used the permanganate-sulphuric acid bleach. I then remembered where I had found an alternative.

Stanley W Bowler's article, Simplified Reversal, in the British Journal Photographic Almanac 1956 (a 1955 Christmas present) states:


Reversal Bath — also known as the Bleach Bath 
The continued insistence in many published formulae on the use of concentrated sulphuric acid is a very real objection, and one to which the writer subscribes fully, having once been burnt by this acid... 
At the suggestion of Mr A.R. Pippard of Johnsons' laboratory, the following alternative bleach bath was tried: 
  Potassium bichromate [now called potassium dichromate]  5gm
  Sodium bisulphate (crystals)                                        25gm
  Water, to make up to                                             1000cc [ml]
 
This reversal or bleach bath works perfectly satisfactorily and no perceptible difference has been found between it and the formula made up with sulphuric acid. It is essential, however, that fresh clean crystals of the sodium bisulphate are used for the bath to be effective — the fact that this material will not keep indefintely under any but the best of conditions has precluded its being supplied, as one might have expected, as part of a reversal kit of chemicals.
Similarly, a potassium permanganate reversal bath may also be used, using 2 grammes of permanganate and 25 grammes of sodium bisulphate per litre. It should be noted that this bath may be used once only and then discarded.

Why the Ilford Application Sheet does not include this information I do not know.

So, if the fancy takes you to try reversal processing of black-and-white film, like FP4, you can avoid the use of highly corrosive sulphuric acid.


BJP Almanacs are readily available
from Alibris, Abebooks and eBay

The first page of Bowler's article


Silverprint links for reversal processing

http://www.silverprint.co.uk/ProductByGroup.asp?PrGrp=506
http://www.silverprint.co.uk/pdf/reversal_web.pdf


Monday, 10 September 2012

Extra Detail or More Crunch? Nikon D800E


There were useful photographs comparing the Nikon D800 with the 800E in ePhotozine:


There was a discernible difference between the two cameras. In some photographs it appeared that was genuinely more detail whereas in others it seemed there was more ‘crunchiness’ as one would expect from a lack of anti-aliasing. Has Nikon achieved a good compromise whereby they have enough anti-aliasing to get extra real detail while avoiding the artifactual over-crunchiness? I suspect they have. Failure to prevent moiré patterning is the downside. The choice between the D800 and the D800E would now be a difficult decision for me.

Wednesday, 5 September 2012

Dufaycolor - Viewing From The Correct Side

My first proper cameras were both 6 x 6 cm roll fim cameras (2¼" square in old money) and I was desperate to try a colour film. Kodachrome was only available for 35 mm and its unperforated roll-fim equivalent, 828. Any colour film was expensive and the first I bought was a 120 roll of Dufaycolor just after, I think, the factory ceased production. It was handed in for processing at the local Boots shop and eventually came back, as I recall, several weeks later.

The film remained cut into 6 x 6 transparencies, being held up to the light for viewing and stored in a film envelope. 2¼ square projectors were extremely expensive.

When scanners first became available, our photographer was kitted out with a flat-bed and transparency hood (and the horrible SCSI card). Because these Dufaycolors had photographs of family members, I asked him to scan them so that they would be safe from deterioration or loss.

I only remembered that I had not told him something important about Dufaycolor when the scans were done and I looked at them on screen. They were reversed left to right. That's because he scanned them as one does any other film or transparency - looking at them from the shiny side. But Dufaycolor was different - you have to view them from the dull (emulsion) side.

I give links to websites explaining Dufaycolor below, so what follows is a resume. On the film base was printed a very fine pattern consisting of transparent blue and green squares or rectangles and red lines. The method of producing this array (reseau) of red, blue and green (shown in one of the websites) was ingenious and must have been the result of extensive experimentation both with the optimal pattern and the printing (the reseau is not that unlike a Bayer screen used in a modern digital camera)  A normal panchromatic film emulsion was then added. In order to achieve colour separation the emulsion was exposed through the base. In the camera, the shiny side faced the lens, not the emulsion - the opposite of normal. That's why Dufaycolors have to be viewed or scanned from the dull side.

Exposing through the base and the printed reseau brought other problems, especially low transparency, so that a much more powerful projector was needed. Projection also enlarged the reseau and it became visible to the audience in a cinema (a few feature films were made with Dufay 35 mm stock) with anything other than a relatively small screen.

The speed was about 8 ASA (or ISO if you must), about the same as most colour films of the time. 

Dufaycolor soon lost ground to the new, subtractive, colour processes exemplified by Kodachrome.

My transparencies do not appear to have deteriorated to any noticeable extent in over 50 years probably because they have not been exposed to light. Information available does suggest the rapid fading of Dufaycolor transparenies in light, especially in a powerful projector.

A couple of years ago, I re-scanned my twelve transparencies in an Epson V500. One of them is shown below along with details of the reseau scanned from small areas of the transparency.


Dufaycolor 6 x 6 Transparency - probably late 1957


Dufaycolor - magnified to show the reseau. Top is parallel
to edge of film  (left hand side of photograph above)
Dufaycolor - magnified to show the reseau. Top is parallel
to edge of film  (left hand side of photograph, top)

Dufaycolor was a French invention developed — ultimately to little avail — by British companies. I did not realise when I walked the dog past the Spicer's paper factory at Sawton, near Cambridge, many years ago that the plant had been the site of secret work to develop Dufaycolor after Spicers bought the process from Louis Dufay in 1926 and before the greatly improved version was launched in 1931.

I had also forgotten that, according to the BJ Almanac of 1956, each box was coded to indicate whether film from a particular batch needed standard exposure, one stop more or one stop less than the indicated exposure. Why they did not just show the speed rating in BS, ASA, DIN, Scheiner or Weston for the particular batch (i.e. 4, 8 or 16 ASA) I do not know.

My twelve transparencies are my only experience of Dufaycolor. They have created interest in this old additive colour process over the years. But if you have scanned slides and the men have breast pockets on the right and the women are buttoned up the wrong way, you may have found some Dufaycolor transparencies.

Links (well worth reading)

http://www.pathefilm.freeserve.co.uk/95flmart/95dufay.htm
http://www.photomemorabilia.co.uk/Ilford/Dufaycolor.html
http://www.retouchpro.com/forums/history-conservation-repair/34149-dufaycolor-scanning-restoring-archiving.html
http://www.aiccm.org.au/docs/Bulletin2008/Vaughan_Bulletin_2008_Vol31.pdf
http://www.brianpritchard.com/Dufay.htm
http://www.oldandsold.com/articles21/color-photography-10.shtml

Friday, 31 August 2012

Nikon P510 for Birding: Update

Since buying my Nikon P510, I have bought two more — as presents for sons. They are delighted with this model for use as a general birding and wildlife camera. For birds and butterflies, we have found it is best to set the focus point to the centre of the field. This can be done in any of the PSAM modes on the top (mode) dial. P (Program) is convenient.  Then, Shooting Menu — AF Area Mode — Center. We then use the camera like a rifle sight with the spot focus at the centre. In P mode, the exposure value is fixed (although compensation is available using the multi selector) but the speed and aperture can be changed inversely in parallel (i.e. shorter shutter speed with larger aperture) by turning the Command Dial.
The AF Area Mode setting in P is remembered, so that the Mode Dial can be turned to Auto for, say, taking a group of people. A one-point turn of the mode dial to P sees the camera back ready for a bird. Butterfly photography is easy while the swing screen makes life on the ground easy for photographing plants, amphibians and reptiles.

The black version of the camera has a far more robust feel than the gun-metal.

Those camera spotting at the Olympics on television will have seen two coaches using P510s to photograph their athletes in action. Ideal I suppose for capturing detail of technique and performance in field events at a distance.

Amateur Photographer in its 'Group Test' of bridge cameras completely missed the point of the Nikon P510 in the issue of 9 June as well as making some silly comments on handling. The whole point why wildlife watchers are buying it is because of the 1000 mm equivalent lens with vibration reduction. Nothing else can do that. The Canon SXH40 HS can get to 840 mm but 840 is not 1000.

I shall only use this camera for video at long focal lengths (600-1000mm equivalent) on a tripod or Trekpod. For relatively static subjects the autofocus seems fine (if not as fast as a £1000 Sony camcorder). There seems to be no quick and easy way to turn vibration reduction off. The Fn button cannot be used for this change, which is unfortunate since getting the camera onto a tripod and then having the delve in the  menu to turn VR off could mean the loss of good footage.

The Nikon P510 is not perfect but it is the best available for the purpose. Birds in flight are difficult but then it is not and does not pretend to be an SLR. If Nikon want a real winner in the very large travel/wildlife camera market and to build on the success of the P510, then they should add raw, enable direct access to the ISO setting and improve the electronic viewfinder  (i.e. add more pixels). The additional cost woud be small beer to bird watchers who spend thousands of pounds, dollars and euros on optical kit.

It will be the camera with us — plus the Sony camcorder and carbon fibre Trekpod — in a long trip through south-east Asia later in the year. The D700 and lenses will stay at home.