The latest update to Final Cut Pro X (version 7.0.7) arrived just as I was starting a major editing job. The contrast with the initially released version is striking. There has been a gradual improvement with each update but this one set the record. I edited two finished videos, each of approximately 80 minutes, without a single crash. The video was full HD (HD-FX from my Sony HDR-XR550) plus a large number of 4000 x 4000 pixel stills. The various exports (Apple use the awful term 'share' for most export purposes) worked flawlessly.
I also used the latest version of Motion 5 (5.0.6) and, with FCPX, the excellent free Pan and Zoom and Manifesto from Noise Industries. Pan and Zoom provides the controls for moving around a still photograph that are absent from the 'Ken Burns' function in FCPX. Manifesto is excellent for rolling credits.
I still think Apple did itself harm by releasing FCPX in a state that showed potential but which lacked key features and was unstable is use. The damage is being repaired and the latest version, I can say without a shadow of doubt, is excellent. With the available add-ons it is even more so.
The Noise Industries Website is at:
http://www.noiseindustries.com/fxfactory/
Sunday, 30 December 2012
Friday, 2 November 2012
Conversation in Kotor: Failure on the Job
Could you please hold my bag while I look for the camera instruction manual? I had to buy this camera at the airport since my last one failed completely last week. To make matters worse, my wife's camera of the same model failed a couple of weeks earlier.Yes, sure. That's bad luck. Were they as dead as dodos?
Completely dead; tried new batteries. Only had the cameras a few months. The model was highly recommended in a magazine. Will never go near that brand again.Ah, the old problem. Reliability never seems to feature in magazine reports. Not so bad as in the 1950s and 1960s when — according to the magazines — every duck of a camera was a swan.
Thanks, at least I can see how the menu works with the manual in front of me. Have you ever had a camera fail as you were using it, other than a battery of course?Yes, I have, twice in fact. The still camera was the Olympus OM-2SP (spot-program) at a graduation. The linkage between the shutter release and the wind-on jammed completely. Could not wind on the film. Catastrophe. The guy who specialised in OM repairs soon sorted it out but the story that there was a problem in the design only emerged years after the camera appeared. Not a word appeared in the photographic press until the OM series began to be discussed as collectors' items.
Until I converted to Nikon, we were a hard-core Olympus family. Pen-FT, OM-2n, OM-2SP and, ultimately, the OM-4Ti. A colleague had bought an OM-1 when they first appeared and those of us who used the small Olympus cameras viewed Canon SLRs as suitable for ham-fisted individuals who could not handle small precision instruments. However, the failure in action of my OM-2SP was never quite forgiven.
The other camera that failed completely when in use was a Leica cine camera — the Leicina 8SV — taking double-8 mm film. There seems some confusion over the variants of the Leicina. Mine had the fully enclosed zoom lens but it was an Angenieux, not a Variogon. However, the point was that the electric motor faltered for a while and then died. I did not bother to get it repaired because super-8 had appeared and provided a leap in quality; double-8 was on the way out. However, I had an instrument technician look at it and he was not impressed by the mechanical design or its execution. As an early 1960s cine camera, the Leicina was excellent in use: superb lens; built like a tank; auto-exposure (through a meter parallel to the lens; peculiar but useful pistol grip which folded away. However, I never quite got over the mechanical failure of a Leica camera.
Thursday, 25 October 2012
Rondinax and Rondix: Daylight Developing Tanks
It is often forgotten that it was — and still is — possible to develop films without having to use a darkroom or changing bag. Most developing tanks sold in the UK had to be loaded in the dark, a process often accompanied by curses as the film jammed or buckled in the reel or chinks of light were spotted around the shutters that were used to cover the windows of a temporary darkroom.
I was given my first developing tank by a great-uncle who had bought it in the 1930s. This Agfa Rondinax 60 was for 120/620 films and I used it for black-and-white films until the 1990s. The Rondinax 60 was a brilliantly designed and constructed but simple daylight tank. No darkroom was necessary. It was also extremely economical to use because the volumes of developer and fixer needed were small. Rondinax 60s, to judge by the prices they reach on eBay, are still a popular purchase for those still using 120 back-and-white film. The only disadvantage was that the spiral had to be rotated continuously (with the recommended short, jerky movements) during developing, rinsing (stop bath) and fixing. However, I see somebody has arranged a motor drive to automate the turning (which I think goes a little too quickly) and a video of it in action is on Youtube:
http://www.urmonas.net/manuals/rondinax/rondinax.html
The 35 mm equivalent was the Rondinax 35 U, also marketed by Leica as the Leitz Rondinax 35, particularly in the USA. Both these tanks had black plastic spirals. The film was dragged onto the spiral by a belt of ‘American cloth’ (rubber-coated cloth) along a plastic film guide. The rubber on the cloth perishes with age but the fabric without the rubber continued to work well for me.
http://www.l-camera-forum.com/leica-wiki.en/index.php/Rondix
The Rondix is far less well known than the Rondinax but was much cheaper to buy. My grandfather bought one around 1957 and, again, I used it until the late 1990s. In this tank, the end of the film is attached to a small central drum and the film wound into the tank from the cassette until the entire film is tight on the drum and resistance is felt on the winding handle. Then the handle is reversed so that the film turns back on itself to become wound on the drum in the opposite direction. When resistance is felt again, the direction is reversed, and so on until developing and fixing are complete.
The film, therefore, sloshes around in the developer/fixer and is never in contact with another loop of film for more than a few seconds at most. I have made a quick diagram to show the principle.
Instructions for the Rondix 35 are at:
http://www.sandham.com/?path=Agfa_Rondix.htm%3f
The Rondix 35 was clearly not so popular as the Rondinax 35 (and neither as popular as the cheaper, vertical tanks that needed to be loaded in the dark). We wondered then whether people thought the film, not being held on a spiral, would be more likely to get scratched but we never found that to be the case. In fact, the Rondix tank and filtered developer produced some of the cleanest negatives I ever produced.
I had several Agfa Karat cameras which used special cassettes for cut lengths of 35 mm film. The film passed from cassette to cassette as in a roll film camera but without the backing paper. I thought the Rondix could not be used because the end of the film was not held in the cassette. However, I see in the more recent instructions that Agfa Rapid cassettes could be used (again, the film was not held). In this case one is instructed to do so many turns to the left and then so many turns to the right, and so on, in order not to pull the entire film into the tank. I would not liked to have risked losing count.
Only two sizes of Rondinax/Rondix tank were produced: for 120/620 and 35 mm film. The significant omission is, of course, 127 and for that size, a darkroom-loading, vertical, ‘universal’ type of tank was needed. I had a Rolleiflex 4 x 4 in the early to mid-1960s and black-and-white processing had to wait for a visit to the darkroom. I had been spoilt by the Rondinax 60 and the Rondix. Daylight-loading 127 tanks were made by an Austrian firm before the second world war and imported after the war but I never saw one advertised.
I never tried reversal processing in these tanks. There was no transparent spiral in the Rondinax 60 to allow exposure to light. Reversal processing may have been possible in the Rondix if a glass or transparent sheet had been held over the film in place of the lid. Turning the handle (with water in the tank) so that light reached the whole film may have done the trick. Again, I did not risk it. The Polly-Max tank I used for 127 films was used for reversal processing of Ferraniacolor.
Informative websites on the history of these tanks are:
http://www.summilux.net/labo/rondinax/
http://www.photomemorabilia.co.uk/Paterson/Developing_Tanks/Tank_History.html
Post second world war copies of the Rondinax 35 (the ‘Essex’ and 60 (the ‘Kent’ were made in a collaboration between Johnsons of Hendon and Neville Brown (NEBRO) in the early 1950s, presumably from designs and patents confiscated by the allies. I have never seen one and the advertisements must have been before my time. By 1955, Agfa was in full flow advertising the Rondinax 35U and the 60 as the advertisement from the BJ Alamanac for 1956 shows (the BJ Almanac for a particular year appeared, as I recall, in the preceding autumn). I think the Rondix 35 appeared the next year.

 |
| How the Rondix 35 Developing Tank Works without a spiral |
Instructions for the Rondix 35 are at:
http://www.sandham.com/?path=Agfa_Rondix.htm%3f
The Rondix 35 was clearly not so popular as the Rondinax 35 (and neither as popular as the cheaper, vertical tanks that needed to be loaded in the dark). We wondered then whether people thought the film, not being held on a spiral, would be more likely to get scratched but we never found that to be the case. In fact, the Rondix tank and filtered developer produced some of the cleanest negatives I ever produced.
Informative websites on the history of these tanks are:
http://www.summilux.net/labo/rondinax/
http://www.photomemorabilia.co.uk/Paterson/Developing_Tanks/Tank_History.html
Post second world war copies of the Rondinax 35 (the ‘Essex’ and 60 (the ‘Kent’ were made in a collaboration between Johnsons of Hendon and Neville Brown (NEBRO) in the early 1950s, presumably from designs and patents confiscated by the allies. I have never seen one and the advertisements must have been before my time. By 1955, Agfa was in full flow advertising the Rondinax 35U and the 60 as the advertisement from the BJ Alamanac for 1956 shows (the BJ Almanac for a particular year appeared, as I recall, in the preceding autumn). I think the Rondix 35 appeared the next year.

Thursday, 18 October 2012
Canon Powershot SX50: A Zoom War?
The announcement of the new Canon SX50 will be exciting to birders and other wildlife photographers. The zoom extends to the 35 mm equivelent of 1200 mm with image stabilisation of 4.5 stops. This is longer than the Nikon P510 I have (1000 mm).
So what's the difference on paper and the theoretical advantages/disadvantages of the two cameras.
Optical Zoom range: P510 24-1000; SX50 24-1200. Apparent advantage to Canon - but see below; Advantage to Canon for video
Maximum aperture: P510 f3-5.9; SX50 f3.4-6.5. Small advantage to Nikon
Sensor Size: P510 1/2.3 in; SX50 1/2.3 in
Resolution: P510 16.1 MPixels; SX50 12.1 MPixels. See discussion below
Size of output: P510 4608 x 3456; SX50 4000 x 3000 pixels. See discussion below
Stabilisation: P510 4 stops; SX50 4.5 stops. Small advantage to Canon
Output: P510 JPEG; SX50 RAW and JPG. Definite advantage to Canon
Weight: P510 555 g; SX50 595 g. Advantage to Nikon
With fewer pixels on the same size sensor, the Canon HX50 should be better in low light with regard to the control of noise than the Nikon. The e-Photozine review says fine to 3200 ASA. So, with respect to noise and low-light photography, the Canon is at an advantage.
In terms of the maximum zoom, the Canon's apparent advantage for still photography is not so clear cut. If the P510's output is enlarged digitally to effectively reduce the resolution to that of the SX50, then the equivalent focal length that can be reached is 1152 mm (the crude calculation is (4608/4000) x 1000). The advantage of the greater focal length is virtually wiped out. For HD video though, the Canon's longer zoom is a definite advantage.
Today, the Canon HX50 is £412 on Amazon.co.uk; the Nikon P510 is £283. Is the advantage of the 1200 mm equivalent lens for video (which is virtually wiped out for stills when resolution is taken into account), RAW output and probably better performance in low light worth the extra money? A hard decision for a new buyer because the only thing I miss on the P510 is RAW.
Will Nikon respond in the battle to keep the wildlife photographer who does not want to lug an SLR by launching a new version with the same resolution, improved control of noise, RAW output and a lens with a focal length greater than 1000 mm equivalent?
Panasonic seem to be going nowhere in this arms race; their latest 'bridge' (awful term) camera (DMC-FZ200) only extends to 600 mm, way off the pace for bird photographers and recorders, despite Amateur Photographer recommending it, for those who want to try their hand at wildlife photography... (29 September 2012). By contrast, the marketeers within Nikon and Canon do at least appear to know what wildlife folks want.
Thursday, 11 October 2012
Ferraniacolor Slides: The Wrong Sort of Water
Conversation on a train:
I have found some old colour slides but they have what look like burst blisters all over them.
Was your father a keen amaateur photographer?
Yes, he processed his own.
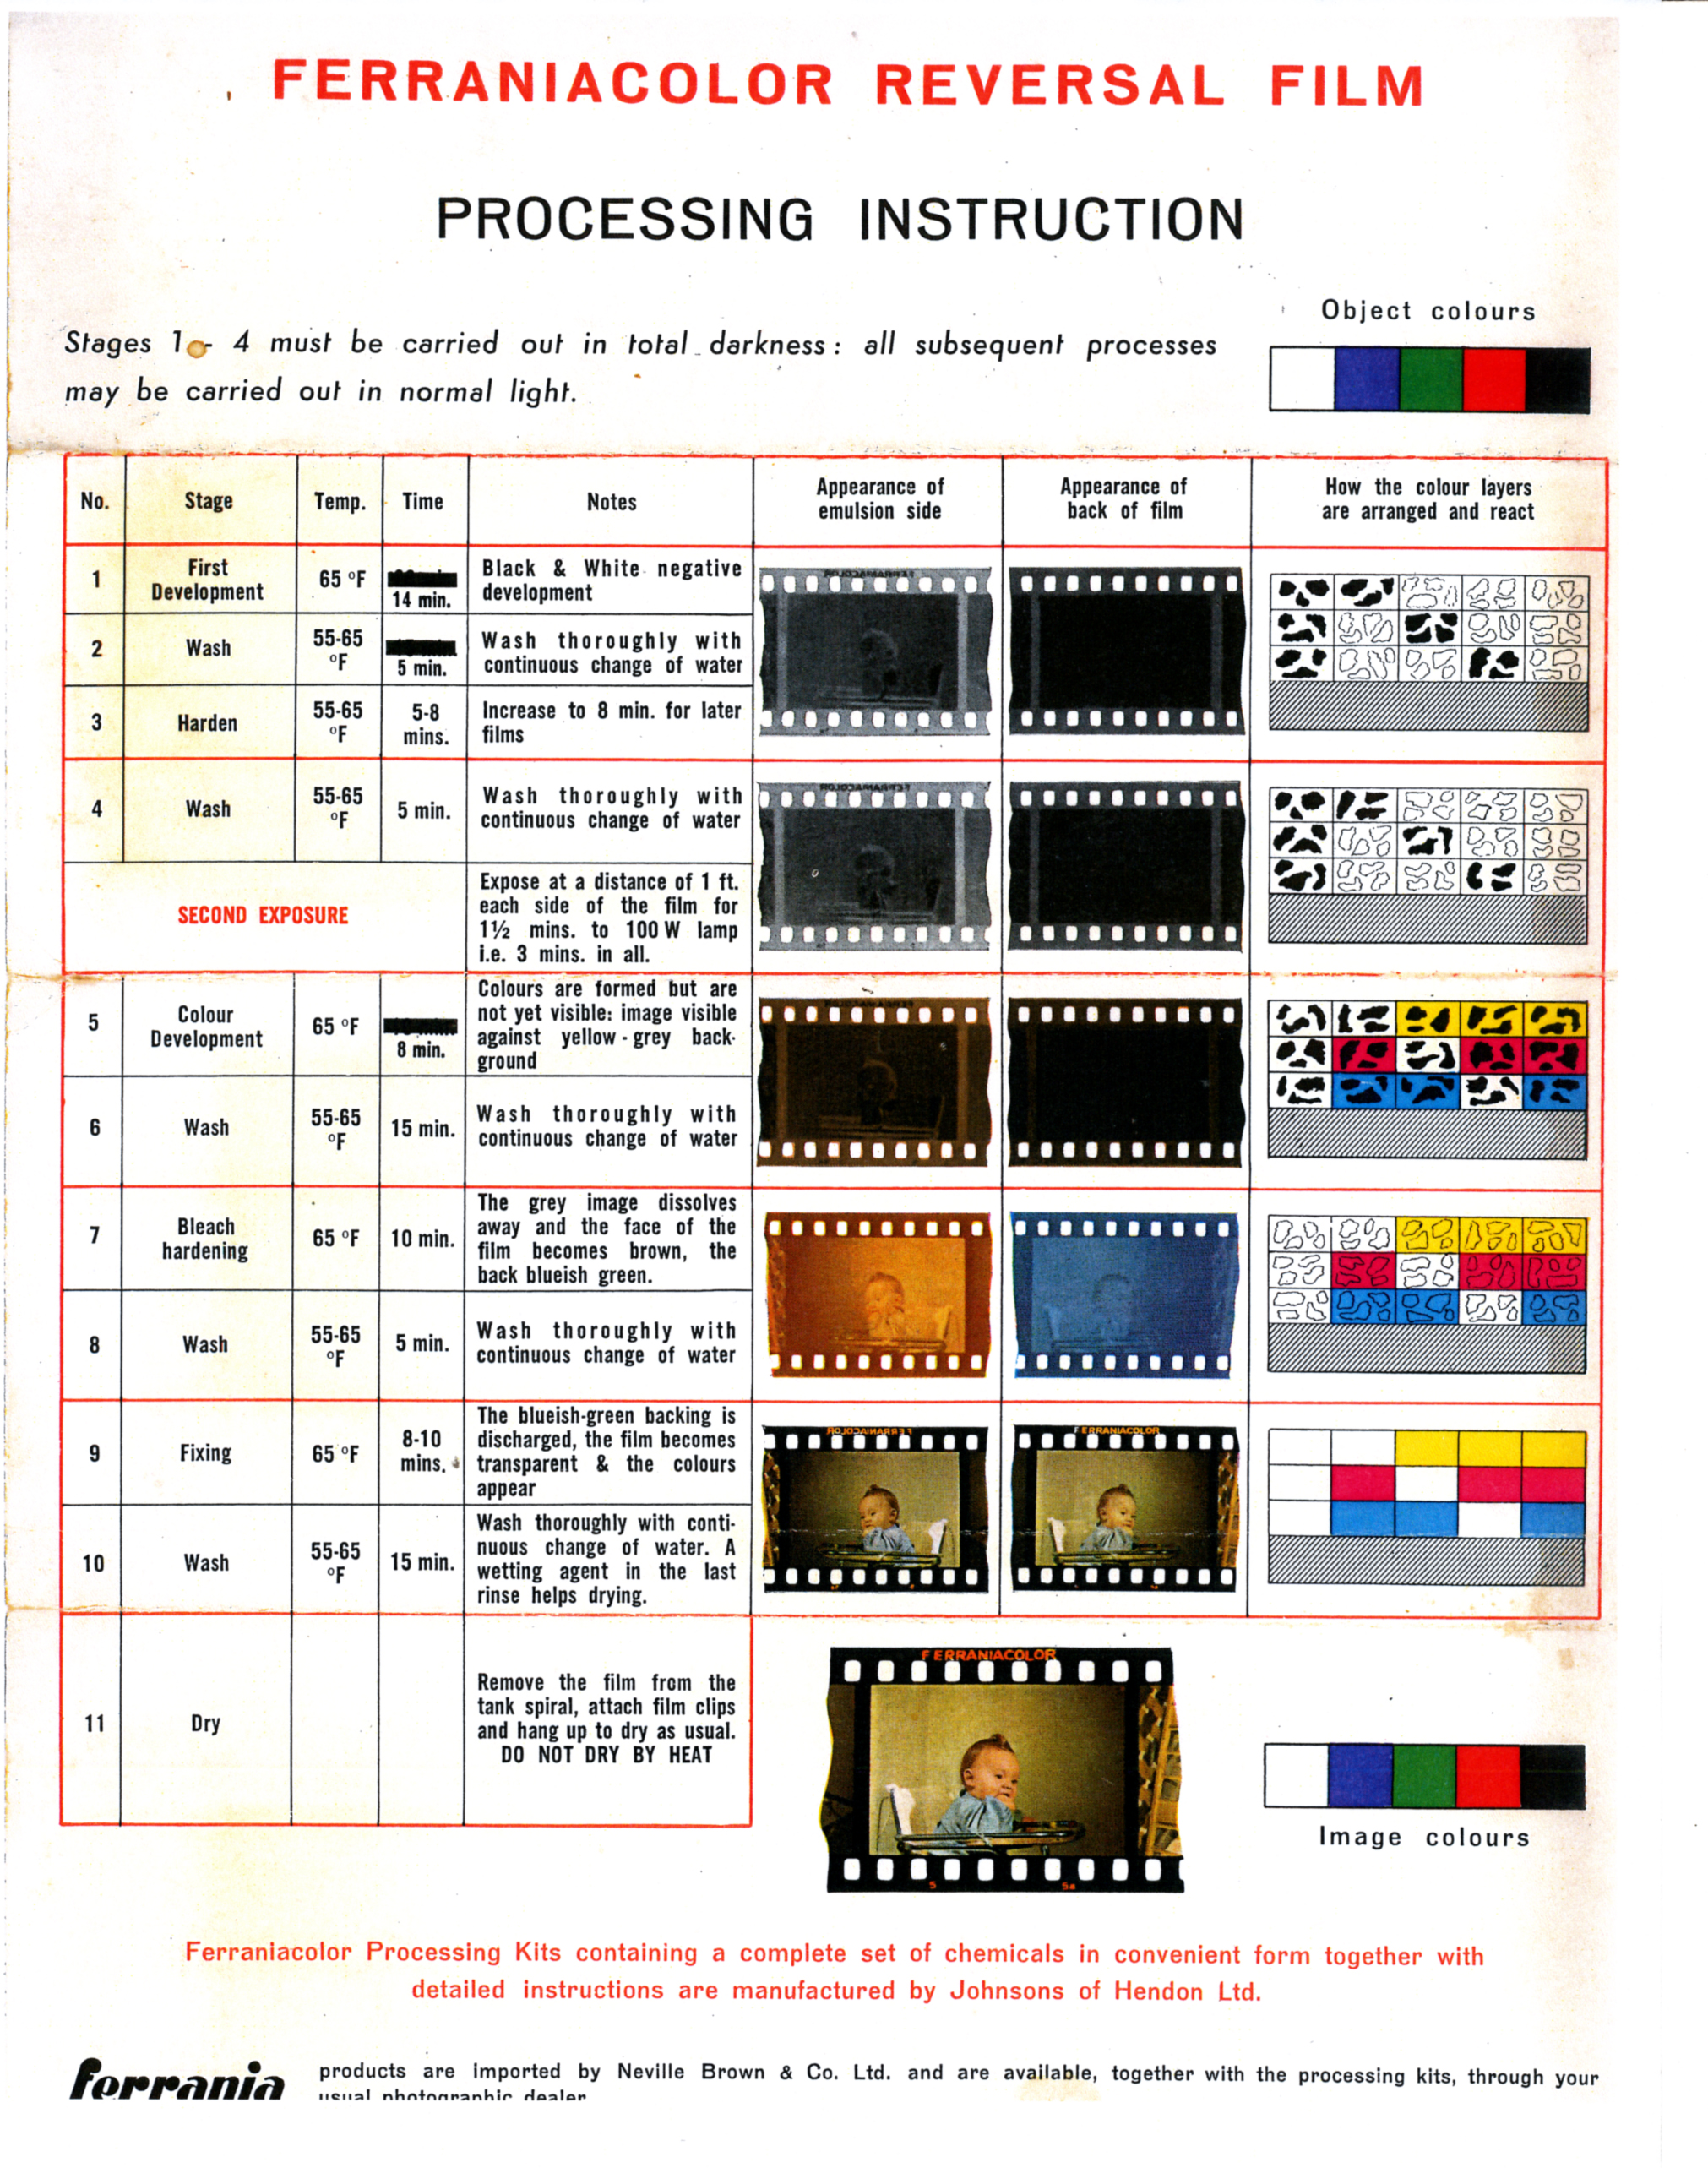
And therein lies the problem. The slides were Ferraniacolor, an old reversal colour film that was extremely popular in the 1950s. Processing kits made by Johnsons of Hendon were sold that enabled the production of very good slides on the day of taking. That was a great advantage compared to Kodachrome or Ilford Colour which had to be sent away in the post to a central processor. But there was a problem. The kit worked fine in hard-water areas. Included in the instructions, however, was the statement that in soft-water areas, an additional step should be included: a 2% magnesium sulphate solution bath after the colour development stage. There was no definition of what was considered to be soft water and no magnesium sulphate (epsom salts) was provided. Therefore, our and am sure many first efforts at processing Ferraniacolor ended in tears, for the emulsion blistered and burst in places. Once we realised that the water was not hard enough, epsom salts came out of the cupboard (most houses had a packet as a laxative) and the problem disappeared. Since the additional magnesium sulphate bath made no difference in hard water areas, since the stuff is cheap and since the bath was for only a short time, I could never see why Johnsons did not include it in their kit and standard processing instructions. I am sure they lost many customers disappointed by their first and perhaps subsequent efforts if they did not realise that their water was not hard enough.
It was especially galling to have this problem when we did not live in an area with what would be described as 'soft' drinking water. Modern maps show it to be moderately hard. Nothing like London tap water or the water from artesian wells in Cambridgeshire but nevertheless on the hard side.
We threw away most of the blistered Ferraniacolor transparencies many years ago, keeping only a couple that could not be replaced. Below is the detail from one showing the blistering:

Incidentally, the popularity of processing Ferraniacolor was such that manufacturers began making film transparent processing spirals. The film was left on the spiral when it was exposed to light as part of the reversal process. Photoflood lamps (later ordinary 100 watt light bulbs) were used for the exposure with the film spiral held and turned over in a bowl of water to prevent the film from overheating. I had a Polly-Max tank made by Johnsons and introduced in 1955.
With hindsight, I wish I had just used Kodachrome for 35 mm slides. The transparencies have stored extremely well and produce good scans. Unfortunately, Agfa CT18 became popular and we have lots of CT18 transparencies. They have also stored well but the grain, as somebody said, is like footballs.
Short processing instructions for Ferraniacolor are shown at:
http://www.brianpritchard.com/Ferrania%20Reversal%20Processing.jpg
I have found some old colour slides but they have what look like burst blisters all over them.
Was your father a keen amaateur photographer?
Yes, he processed his own.
And therein lies the problem. The slides were Ferraniacolor, an old reversal colour film that was extremely popular in the 1950s. Processing kits made by Johnsons of Hendon were sold that enabled the production of very good slides on the day of taking. That was a great advantage compared to Kodachrome or Ilford Colour which had to be sent away in the post to a central processor. But there was a problem. The kit worked fine in hard-water areas. Included in the instructions, however, was the statement that in soft-water areas, an additional step should be included: a 2% magnesium sulphate solution bath after the colour development stage. There was no definition of what was considered to be soft water and no magnesium sulphate (epsom salts) was provided. Therefore, our and am sure many first efforts at processing Ferraniacolor ended in tears, for the emulsion blistered and burst in places. Once we realised that the water was not hard enough, epsom salts came out of the cupboard (most houses had a packet as a laxative) and the problem disappeared. Since the additional magnesium sulphate bath made no difference in hard water areas, since the stuff is cheap and since the bath was for only a short time, I could never see why Johnsons did not include it in their kit and standard processing instructions. I am sure they lost many customers disappointed by their first and perhaps subsequent efforts if they did not realise that their water was not hard enough.
It was especially galling to have this problem when we did not live in an area with what would be described as 'soft' drinking water. Modern maps show it to be moderately hard. Nothing like London tap water or the water from artesian wells in Cambridgeshire but nevertheless on the hard side.
We threw away most of the blistered Ferraniacolor transparencies many years ago, keeping only a couple that could not be replaced. Below is the detail from one showing the blistering:

Incidentally, the popularity of processing Ferraniacolor was such that manufacturers began making film transparent processing spirals. The film was left on the spiral when it was exposed to light as part of the reversal process. Photoflood lamps (later ordinary 100 watt light bulbs) were used for the exposure with the film spiral held and turned over in a bowl of water to prevent the film from overheating. I had a Polly-Max tank made by Johnsons and introduced in 1955.
With hindsight, I wish I had just used Kodachrome for 35 mm slides. The transparencies have stored extremely well and produce good scans. Unfortunately, Agfa CT18 became popular and we have lots of CT18 transparencies. They have also stored well but the grain, as somebody said, is like footballs.
Short processing instructions for Ferraniacolor are shown at:
http://www.brianpritchard.com/Ferrania%20Reversal%20Processing.jpg
Tuesday, 25 September 2012
Black and White Film: Reversal Processing
A query from a reader in Amateur Photographer brought back memories of black-and-white reversal processing in the 1950s and 1960s. The reader, who described himself as a technophobe, was asking about the discontinued Agfa Scala and the still-available Fomapan reversal films. Clearly the readers is not a techophobe if he wants to make black-and-white slides or filmstrips by reversal processing but a neophobe. 'Wet' processing is far more technically involved than using a digital camera.
In the Silverprint website, Foma reversal processing kits are available along with the instructions. Also shown is the Ilford Application Sheet from 2003, Reversal Processing Using Ilford Black & White Films to Make Monochrome Transparencies. This Ilford sheet shows the use of potassium permanganate and concentrated sulphuric acid as the bleach bath. Concentrated or even dilute sulphuric acid is not pleasant to have around the house. I remembered that I had reversal processed Ilford FP3 and Pan F to make slides in the 1950s/early 1960s and that I had not used the permanganate-sulphuric acid bleach. I then remembered where I had found an alternative.
Stanley W Bowler's article, Simplified Reversal, in the British Journal Photographic Almanac 1956 (a 1955 Christmas present) states:
Why the Ilford Application Sheet does not include this information I do not know.
So, if the fancy takes you to try reversal processing of black-and-white film, like FP4, you can avoid the use of highly corrosive sulphuric acid.
Silverprint links for reversal processing
http://www.silverprint.co.uk/ProductByGroup.asp?PrGrp=506
http://www.silverprint.co.uk/pdf/reversal_web.pdf
In the Silverprint website, Foma reversal processing kits are available along with the instructions. Also shown is the Ilford Application Sheet from 2003, Reversal Processing Using Ilford Black & White Films to Make Monochrome Transparencies. This Ilford sheet shows the use of potassium permanganate and concentrated sulphuric acid as the bleach bath. Concentrated or even dilute sulphuric acid is not pleasant to have around the house. I remembered that I had reversal processed Ilford FP3 and Pan F to make slides in the 1950s/early 1960s and that I had not used the permanganate-sulphuric acid bleach. I then remembered where I had found an alternative.
Stanley W Bowler's article, Simplified Reversal, in the British Journal Photographic Almanac 1956 (a 1955 Christmas present) states:
Reversal Bath — also known as the Bleach Bath
The continued insistence in many published formulae on the use of concentrated sulphuric acid is a very real objection, and one to which the writer subscribes fully, having once been burnt by this acid...
At the suggestion of Mr A.R. Pippard of Johnsons' laboratory, the following alternative bleach bath was tried:
Potassium bichromate [now called potassium dichromate] 5gm
Sodium bisulphate (crystals) 25gm
Water, to make up to 1000cc [ml]
This reversal or bleach bath works perfectly satisfactorily and no perceptible difference has been found between it and the formula made up with sulphuric acid. It is essential, however, that fresh clean crystals of the sodium bisulphate are used for the bath to be effective — the fact that this material will not keep indefintely under any but the best of conditions has precluded its being supplied, as one might have expected, as part of a reversal kit of chemicals.
Similarly, a potassium permanganate reversal bath may also be used, using 2 grammes of permanganate and 25 grammes of sodium bisulphate per litre. It should be noted that this bath may be used once only and then discarded.
Why the Ilford Application Sheet does not include this information I do not know.
So, if the fancy takes you to try reversal processing of black-and-white film, like FP4, you can avoid the use of highly corrosive sulphuric acid.
 |
| BJP Almanacs are readily available from Alibris, Abebooks and eBay |
 |
| The first page of Bowler's article |
Silverprint links for reversal processing
http://www.silverprint.co.uk/ProductByGroup.asp?PrGrp=506
http://www.silverprint.co.uk/pdf/reversal_web.pdf
Monday, 10 September 2012
Extra Detail or More Crunch? Nikon D800E
There were useful photographs comparing the Nikon D800 with the 800E in ePhotozine:
Wednesday, 5 September 2012
Dufaycolor - Viewing From The Correct Side
My first proper cameras were both 6 x 6 cm roll fim cameras (2¼" square in old money) and I was desperate to try a colour film. Kodachrome was only available for 35 mm and its unperforated roll-fim equivalent, 828. Any colour film was expensive and the first I bought was a 120 roll of Dufaycolor just after, I think, the factory ceased production. It was handed in for processing at the local Boots shop and eventually came back, as I recall, several weeks later.
The film remained cut into 6 x 6 transparencies, being held up to the light for viewing and stored in a film envelope. 2¼ square projectors were extremely expensive.
When scanners first became available, our photographer was kitted out with a flat-bed and transparency hood (and the horrible SCSI card). Because these Dufaycolors had photographs of family members, I asked him to scan them so that they would be safe from deterioration or loss.
I only remembered that I had not told him something important about Dufaycolor when the scans were done and I looked at them on screen. They were reversed left to right. That's because he scanned them as one does any other film or transparency - looking at them from the shiny side. But Dufaycolor was different - you have to view them from the dull (emulsion) side.
I give links to websites explaining Dufaycolor below, so what follows is a resume. On the film base was printed a very fine pattern consisting of transparent blue and green squares or rectangles and red lines. The method of producing this array (reseau) of red, blue and green (shown in one of the websites) was ingenious and must have been the result of extensive experimentation both with the optimal pattern and the printing (the reseau is not that unlike a Bayer screen used in a modern digital camera) A normal panchromatic film emulsion was then added. In order to achieve colour separation the emulsion was exposed through the base. In the camera, the shiny side faced the lens, not the emulsion - the opposite of normal. That's why Dufaycolors have to be viewed or scanned from the dull side.
Exposing through the base and the printed reseau brought other problems, especially low transparency, so that a much more powerful projector was needed. Projection also enlarged the reseau and it became visible to the audience in a cinema (a few feature films were made with Dufay 35 mm stock) with anything other than a relatively small screen.
The speed was about 8 ASA (or ISO if you must), about the same as most colour films of the time.
Dufaycolor soon lost ground to the new, subtractive, colour processes exemplified by Kodachrome.
My transparencies do not appear to have deteriorated to any noticeable extent in over 50 years probably because they have not been exposed to light. Information available does suggest the rapid fading of Dufaycolor transparenies in light, especially in a powerful projector.
A couple of years ago, I re-scanned my twelve transparencies in an Epson V500. One of them is shown below along with details of the reseau scanned from small areas of the transparency.
Dufaycolor was a French invention developed — ultimately to little avail — by British companies. I did not realise when I walked the dog past the Spicer's paper factory at Sawton, near Cambridge, many years ago that the plant had been the site of secret work to develop Dufaycolor after Spicers bought the process from Louis Dufay in 1926 and before the greatly improved version was launched in 1931.
I had also forgotten that, according to the BJ Almanac of 1956, each box was coded to indicate whether film from a particular batch needed standard exposure, one stop more or one stop less than the indicated exposure. Why they did not just show the speed rating in BS, ASA, DIN, Scheiner or Weston for the particular batch (i.e. 4, 8 or 16 ASA) I do not know.
My twelve transparencies are my only experience of Dufaycolor. They have created interest in this old additive colour process over the years. But if you have scanned slides and the men have breast pockets on the right and the women are buttoned up the wrong way, you may have found some Dufaycolor transparencies.
Links (well worth reading)
http://www.pathefilm.freeserve.co.uk/95flmart/95dufay.htm
http://www.photomemorabilia.co.uk/Ilford/Dufaycolor.html
http://www.retouchpro.com/forums/history-conservation-repair/34149-dufaycolor-scanning-restoring-archiving.html
http://www.aiccm.org.au/docs/Bulletin2008/Vaughan_Bulletin_2008_Vol31.pdf
http://www.brianpritchard.com/Dufay.htm
http://www.oldandsold.com/articles21/color-photography-10.shtml
The film remained cut into 6 x 6 transparencies, being held up to the light for viewing and stored in a film envelope. 2¼ square projectors were extremely expensive.
When scanners first became available, our photographer was kitted out with a flat-bed and transparency hood (and the horrible SCSI card). Because these Dufaycolors had photographs of family members, I asked him to scan them so that they would be safe from deterioration or loss.
I only remembered that I had not told him something important about Dufaycolor when the scans were done and I looked at them on screen. They were reversed left to right. That's because he scanned them as one does any other film or transparency - looking at them from the shiny side. But Dufaycolor was different - you have to view them from the dull (emulsion) side.
I give links to websites explaining Dufaycolor below, so what follows is a resume. On the film base was printed a very fine pattern consisting of transparent blue and green squares or rectangles and red lines. The method of producing this array (reseau) of red, blue and green (shown in one of the websites) was ingenious and must have been the result of extensive experimentation both with the optimal pattern and the printing (the reseau is not that unlike a Bayer screen used in a modern digital camera) A normal panchromatic film emulsion was then added. In order to achieve colour separation the emulsion was exposed through the base. In the camera, the shiny side faced the lens, not the emulsion - the opposite of normal. That's why Dufaycolors have to be viewed or scanned from the dull side.
Exposing through the base and the printed reseau brought other problems, especially low transparency, so that a much more powerful projector was needed. Projection also enlarged the reseau and it became visible to the audience in a cinema (a few feature films were made with Dufay 35 mm stock) with anything other than a relatively small screen.
The speed was about 8 ASA (or ISO if you must), about the same as most colour films of the time.
Dufaycolor soon lost ground to the new, subtractive, colour processes exemplified by Kodachrome.
My transparencies do not appear to have deteriorated to any noticeable extent in over 50 years probably because they have not been exposed to light. Information available does suggest the rapid fading of Dufaycolor transparenies in light, especially in a powerful projector.
A couple of years ago, I re-scanned my twelve transparencies in an Epson V500. One of them is shown below along with details of the reseau scanned from small areas of the transparency.
 |
| Dufaycolor 6 x 6 Transparency - probably late 1957 |
 |
| Dufaycolor - magnified to show the reseau. Top is parallel to edge of film (left hand side of photograph above) |
 |
| Dufaycolor - magnified to show the reseau. Top is parallel to edge of film (left hand side of photograph, top) |
Dufaycolor was a French invention developed — ultimately to little avail — by British companies. I did not realise when I walked the dog past the Spicer's paper factory at Sawton, near Cambridge, many years ago that the plant had been the site of secret work to develop Dufaycolor after Spicers bought the process from Louis Dufay in 1926 and before the greatly improved version was launched in 1931.
I had also forgotten that, according to the BJ Almanac of 1956, each box was coded to indicate whether film from a particular batch needed standard exposure, one stop more or one stop less than the indicated exposure. Why they did not just show the speed rating in BS, ASA, DIN, Scheiner or Weston for the particular batch (i.e. 4, 8 or 16 ASA) I do not know.
My twelve transparencies are my only experience of Dufaycolor. They have created interest in this old additive colour process over the years. But if you have scanned slides and the men have breast pockets on the right and the women are buttoned up the wrong way, you may have found some Dufaycolor transparencies.
Links (well worth reading)
http://www.pathefilm.freeserve.co.uk/95flmart/95dufay.htm
http://www.photomemorabilia.co.uk/Ilford/Dufaycolor.html
http://www.retouchpro.com/forums/history-conservation-repair/34149-dufaycolor-scanning-restoring-archiving.html
http://www.aiccm.org.au/docs/Bulletin2008/Vaughan_Bulletin_2008_Vol31.pdf
http://www.brianpritchard.com/Dufay.htm
http://www.oldandsold.com/articles21/color-photography-10.shtml
Friday, 31 August 2012
Nikon P510 for Birding: Update
Since buying my Nikon P510, I have bought two more — as presents for sons. They are delighted with this model for use as a general birding and wildlife camera. For birds and butterflies, we have found it is best to set the focus point to the centre of the field. This can be done in any of the PSAM modes on the top (mode) dial. P (Program) is convenient. Then, Shooting Menu — AF Area Mode — Center. We then use the camera like a rifle sight with the spot focus at the centre. In P mode, the exposure value is fixed (although compensation is available using the multi selector) but the speed and aperture can be changed inversely in parallel (i.e. shorter shutter speed with larger aperture) by turning the Command Dial.
The AF Area Mode setting in P is remembered, so that the Mode Dial can be turned to Auto for, say, taking a group of people. A one-point turn of the mode dial to P sees the camera back ready for a bird. Butterfly photography is easy while the swing screen makes life on the ground easy for photographing plants, amphibians and reptiles.
The black version of the camera has a far more robust feel than the gun-metal.
Those camera spotting at the Olympics on television will have seen two coaches using P510s to photograph their athletes in action. Ideal I suppose for capturing detail of technique and performance in field events at a distance.
Amateur Photographer in its 'Group Test' of bridge cameras completely missed the point of the Nikon P510 in the issue of 9 June as well as making some silly comments on handling. The whole point why wildlife watchers are buying it is because of the 1000 mm equivalent lens with vibration reduction. Nothing else can do that. The Canon SXH40 HS can get to 840 mm but 840 is not 1000.
I shall only use this camera for video at long focal lengths (600-1000mm equivalent) on a tripod or Trekpod. For relatively static subjects the autofocus seems fine (if not as fast as a £1000 Sony camcorder). There seems to be no quick and easy way to turn vibration reduction off. The Fn button cannot be used for this change, which is unfortunate since getting the camera onto a tripod and then having the delve in the menu to turn VR off could mean the loss of good footage.
The Nikon P510 is not perfect but it is the best available for the purpose. Birds in flight are difficult but then it is not and does not pretend to be an SLR. If Nikon want a real winner in the very large travel/wildlife camera market and to build on the success of the P510, then they should add raw, enable direct access to the ISO setting and improve the electronic viewfinder (i.e. add more pixels). The additional cost woud be small beer to bird watchers who spend thousands of pounds, dollars and euros on optical kit.
It will be the camera with us — plus the Sony camcorder and carbon fibre Trekpod — in a long trip through south-east Asia later in the year. The D700 and lenses will stay at home.
Saturday, 25 August 2012
Apple Aperture 3 and Nikon Capture NX2
During the past year I have imported all my old photographs to Aperture 3. I had edited photographs either in Photoshop or, for Nikon Raw, Nikon Capture NX2. I was so impressed by Aperture 3 for both organisation and editing that I started to import Nikon Raws and to work on them there. However, I was struck that they seemed much flatter and darker than when imported into Capture NX2 and needed more work to produce a basic image.
On a Google search, I found others had noticed the difference, for example, this excellent website:
http://www.andymumford.co.uk/blog/archives/1278
If one uses Capture NX2 from within Aperture, the useful Nikon picture controls are lost because the Raw NEF file is not exported to NX2.
To illustrate the difference, I show below a photograph I had taken out of the back door to test a lens on my D700. I imported the raw file into Aperture 3, Capture NX2 and the Adobe Raw converter. I then had to export jpgs in order to upload the photographs shown.
I also show above, the effect of the appropriate Nikon Raw preset from:
http://www.appleaperturepresets.net
Even that does not come close to the initial view of a Raw in Capture NX2.
However, I then found Catapult, a plug-in for Aperture 3 that does allow the export and re-import of the original Raw file from Aperture to Capture NX2. Although one has to remember the various 'save' steps to make sure the process works properly, Catapult works and is highly effective. All the controls of Capture NX2 are retained while the files are managed in Aperture.
Catapult can be downloaded from:
http://brushedpixel.com/catapult
The full version costs $29 and the 'lite' $9 (no batch processing with the latter).
I also have PTLens installed as an Aperture plug-in. This is an excellent piece of software that corrects lens pincushion/barrel distortion, vignetting, chromatic aberration, and perspective using the characeteristics of the lens read from the metadata (now called 'Info' in the upgraded Aperture 3).
http://epaperpress.com/ptlens/index.html
Capture NX2 will also do that, of course, but if it is not necessary to use that software, PTLens adds to the adjustments available in Aperture.
Andy Mumford (link given above) explains the pros and cons of Capture NX2 well. I have used it in both Windows and Mac. It is not so slow as it was but the user interface and method of working on an image are not intuitive. The controls — through control points and U-point technology — are highly impressive. It really does need a major upgrade though. Either that or Nikon should enable Apple and Adobe access to its Raw handling data while selling the advanced features through the Nik effects plug-ins.
If you are thinking of using Nikon Capture NX2 the User's Manual is essential and the book by Mike Hagen, Nikon Capture NX2 After the Shoot (Wiley, Indianapolis, 2009. ISBN 978-0-470-40926-8) is also very useful.
Aperture 3, along with a lot of the Apple software for the iMac, is a bargain and I can do more than 90% of what I need to do using it alone. I wonder if Aperture 4, on which the usual Apple rumours are rife, will have better initial handling of Nikon Raw files.
Finally, apart from occasional comparisons of software in some of the magazines (Advanced Photographer, for example), the whole emphasis in video editing is given to the full and highly expensive version of Photoshop and, sometimes, Lightroom. One imagines that magazines do not have to pay for their software and that the marketing department of Adobe is not backward in promoting its wares. Far better information is available from websites.
On a Google search, I found others had noticed the difference, for example, this excellent website:
http://www.andymumford.co.uk/blog/archives/1278
If one uses Capture NX2 from within Aperture, the useful Nikon picture controls are lost because the Raw NEF file is not exported to NX2.
To illustrate the difference, I show below a photograph I had taken out of the back door to test a lens on my D700. I imported the raw file into Aperture 3, Capture NX2 and the Adobe Raw converter. I then had to export jpgs in order to upload the photographs shown.
 |
| Aperture - As shown at import of NEF Raw File |
 |
| Nikon Capture NX2 - As shown at import of NEF Raw File |
 |
| Adobe - As shown at import of NEF Raw File |
 |
| Aperture plus Nikon Raw Preset from AppleAperturePresets |
http://www.appleaperturepresets.net
Even that does not come close to the initial view of a Raw in Capture NX2.
However, I then found Catapult, a plug-in for Aperture 3 that does allow the export and re-import of the original Raw file from Aperture to Capture NX2. Although one has to remember the various 'save' steps to make sure the process works properly, Catapult works and is highly effective. All the controls of Capture NX2 are retained while the files are managed in Aperture.
Catapult can be downloaded from:
http://brushedpixel.com/catapult
The full version costs $29 and the 'lite' $9 (no batch processing with the latter).
I also have PTLens installed as an Aperture plug-in. This is an excellent piece of software that corrects lens pincushion/barrel distortion, vignetting, chromatic aberration, and perspective using the characeteristics of the lens read from the metadata (now called 'Info' in the upgraded Aperture 3).
http://epaperpress.com/ptlens/index.html
Capture NX2 will also do that, of course, but if it is not necessary to use that software, PTLens adds to the adjustments available in Aperture.
Andy Mumford (link given above) explains the pros and cons of Capture NX2 well. I have used it in both Windows and Mac. It is not so slow as it was but the user interface and method of working on an image are not intuitive. The controls — through control points and U-point technology — are highly impressive. It really does need a major upgrade though. Either that or Nikon should enable Apple and Adobe access to its Raw handling data while selling the advanced features through the Nik effects plug-ins.
If you are thinking of using Nikon Capture NX2 the User's Manual is essential and the book by Mike Hagen, Nikon Capture NX2 After the Shoot (Wiley, Indianapolis, 2009. ISBN 978-0-470-40926-8) is also very useful.
Aperture 3, along with a lot of the Apple software for the iMac, is a bargain and I can do more than 90% of what I need to do using it alone. I wonder if Aperture 4, on which the usual Apple rumours are rife, will have better initial handling of Nikon Raw files.
Finally, apart from occasional comparisons of software in some of the magazines (Advanced Photographer, for example), the whole emphasis in video editing is given to the full and highly expensive version of Photoshop and, sometimes, Lightroom. One imagines that magazines do not have to pay for their software and that the marketing department of Adobe is not backward in promoting its wares. Far better information is available from websites.
Sunday, 19 August 2012
Focal length of digiscopes compared to camera lenses
Does that mean you don’t have to fiddle about putting a camera on the telescope, then?
That was the question asked when I was showing off the capabilities of the Nikon P510 at the 35 mm camera equivalent of 1000mm. The question was also loaded in that it implied I would not need to buy a camera for digiscoping to replace the old Canon Ixus that fitted the scope awkwardly. The follow-up question — Surely that 1000 mm lens is as good as a scope isn’t it? — sent me in search of data. Evidence that useful as the 1000 mm is, it could not match the focal lengths of a telescope plus camera was needed. What is the focal length of a digiscope set-up in terms equivalent to a 35 mm full-frame camera?
To determine the equivalent focal length for a digital camera compared to a 35 mm camera, you need to carry out a few calculations. Each digital camera has a 35 mm equivalent figure. For the Nikon P-6000, for example, the 35 mm equivalent figure is 28–112 mm. Since the Nikon P-6000 has a digital focal length of 6–24 mm, this results in a factor of 4.66 (28 mm divided by 6 mm). This factor or the 35mm equivalent focal length is usually stated in the camera’s user manual.
In this case, the equivalent focal length is the adjusted focal length of the digital camera multiplied by the factor 4.66. Example: The Nikon P-6000 is set to a focal length of 14 mm. 14 mm x 4.66 = 65.2 mm focal length equivalent for a 35 mm camera.
To obtain the entire 35 mm equivalent focal length from your digiscoping equipment, you need to multiply that focal length by the magnification of your scope.
Example: Your telescope is set at 20x magnification. 65.2 mm x 20 = 1,304 mm total 35 mm equivalent focal length
To determine the total digital focal length of your digiscoping equipment, you simply need to multiply the focal length of your digital camera by the magnification settings of your telescope.
Example: Your digital camera is set to 14 mm focal length; the telescope is at 20x magnification: 14 mm x 20 = 280 mm total digital focal length
So I thought I would try it out in practice, because as, we shall see below, this is not the only formula doing the rounds on the internet. The old Ixus is ‘on loan’ and I had to use the only camera in the house that was vaguely suitable — my wife’s underwater Panasonic Lumix DMC-FT3 with its square lens housing. I managed to hold this to the eyepiece and zoom in until there was a full frame without vignetting. I then looked at the metadata. The camera focal length was 7 mm. The factor needed to convert to 35 mm equivalent was calculated from the actual zoom range of 4.9-22.8 mm and the stated 35 mm equivalent of 28-128 mm. 28/4.9 is 5.71 and 128/22.8 is 5.61 so I took the mean of 5.66. The telescope magnification was 40. Therefore, the 35 mm equivalent focal length of the whole set-up was 5.66 x 7 x 40 = 1584 mm.
The story does not end there because the Google search showed other sites which showed calculations for focal length. In the first (http://www.birddigiscoper.com/2009/08/digiscoping-math.html), I could not see how the writer had derived the formula or the constants used. Putting the same values into his formula I came up with a focal length of 2263 mm! Another website (http://www.digibird.com/primerdir/primer0.htm) provides an Excel spreadsheet which came up with 1720 mm. In the latter case, the difference is in the way the 35 mm equivalent focal length of the camera lens is calculated but since I do not know how a constant used for the calculation was derived I cannot comment further. These cases demonstrate how dangerous the internet is for spreading and retaining incorrect information. I have shown the web addresses but not shown them as links for this reason.
Just in case you are wondering whether Swarovski got it wrong and the other guy is right (even though I could find no basis for the formula he came up with), I did stand in the same place with my Nikon P510 and take a picture at 1000 mm equivalent of the same object at the bottom of the garden. I then measured the size of the object in relation to the width of the frame on the screen. In my crude Lumix digiscoped shot, the object occupied 0.58 of the total width; in the Nikon it occupied 0.36 of the width. Dividing one by the other, 0.58/0.36 = 1.61. Thus, the focal length of the digiscope was 1.61 times that of the Nikon or 1610 mm, remarkably close to the calculated 1584 mm given the crudity of the size measurements. Clearly, the formula given by Swarovski is the one to use when calculating the focal length of a digiscope set-up when using a digital compact camera. I just hope that people find that one first in any Google search.
The focal length of any digiscope set-up can be calculated from the camera focal length (found in the metadata after taking), the manufacturer’s stated zoom range in 35 mm equivalents and the magnification of the telescope eyepiece.
And, just in case you were wondering, great as the 1000 mm equivalent lens of the Nikon P510 is for birds, it does not replace the digiscope entirely. Much longer focal lengths can be achieved with the latter but whether there is enough light or time to set up the scope is another matter.
Friday, 17 August 2012
Eyepieces of course
The original version of the previous post refered to 'objectives' instead of 'eyepieces' Thanks to a contributor to Birdforum for pointing out the obvious error. I have only two excuses: 1. I had been working on a consultancy project involving different microscope objectives and must have had objectives on the brain when I was writing about eyepieces for telescopes; 2. Is age catching up with me? The post, including the diagram, has now been corrected.
Saturday, 11 August 2012
Which Eyepiece for Leica apo-Televid 77?
I carry three eyepieces with me when using the apo-Televid 77. Why?
20x WW (41009)
32x WW (41011)
40x (41003)
40x WW (41007)
30-60x Zoom (41005)

Now to the eyepieces I carry with me:
I usually have the 40x WW (41007) fitted. It has a 1.8° angle of view (32 metres field at 1000 metres) and an exit pupil of 1.8 mm. It is a superb lens. But if the light is relatively low or a wider field is needed, then I can quickly switch to the 32x WW (41011) (2.3° angle of view — 40 metres field at 1000 metres; 2.3 mm exit pupil). Another superb lens. If the light really starts to fade or if I want to scan and count then the 20x WW (41009) comes into its own. This gives a 3.45° angle of view (60 metre field at 1000 metres) with an exit pupil of 3.45 mm.
 |
| 40x WW fitted on the Apo-Televid 77 |
The value of carrying three eyepieces was illustrated by an evening in the Eric Morecambe Hide at the RSPB’s Leighton Moss reserve. A flock of Black-tailed Godwits looked superb with the 40x WW but as the light began to fade, the 32x WW was needed. As the colours began to become indistinct, a quick change to the 20x WW brought the scene back to life.
 |
| The three WW eyepieces I carry |
A factor in choosing eyepieces is digiscoping. It is worth noting that the Leica Digital Adapter 2 (42303) nor the Digilux 1 Adapter (42302) will not fit either of the 40x eyepieces. The diameter of the various eyepieces for fitting digiscoping collars are: 54 mm (32x WW); 53 mm (20x WW and 20-60x); 50 mm (40x WW); 45 mm (40x). It is worth talking to SRB Griturn about digiscoping adapters for all these eyepieces.
SRB Griturn can be found at: http://www.srb-griturn.com
 |
| Leica Digital Adapter 2 (42303) fitted to 32x WW eyepiece |
Finally, these eyepieces were also made for the Televid 62 but have lower magnifications (by a factor 0f 0.8). 40x becomes 32x, and 32x becomes 26x on the Televid 62.
Monday, 23 July 2012
Photographic Magazines
Editors of UK photographic magazines have a hard time. Publishers want and need maximum sales and that means catering for as large a market as possible. The mass market, sadly, has the attention span of a gnat, the educational achievements of a 1950s ten-year old and the intelligence of a a less than bright lowland gorilla. Editors who have tried to raise the standards have been pushed out of the way over the years as publishers have made it clear that only the volume of sales count for their survival and their advertisers’ profits.
I picked up a copy of Practical Photography. This once very good magazine was pushed downmarket a number of years ago. Quite clearly, it is firmly entrenched there. Amateur Photographer still tries to achieve a balance, sometimes successfully but often not. It has the added difficulty of being a weekly publication. I thought that Digital Photographer was trying hard and in the right direction for a while but has recently gone downhill.
One Editor who, wherever he has been, has tried to raise the standard is William Cheung. His Advanced Photographer started very well and I now subscribe to the digital version. Recently there has been — for me — an overemphasis on studio lighting with photon-by-photon accounts of set-ups for portraiture. Time will tell if this one can keep up its early high standard.
I occasionally buy a copy of British Journal of Photography to see what angle ‘professional’ photographers are taking on what it considers good work and good equipment. However, and cutting beneath the arty-farty self-reverential tone, only a few features justify an occasional purchase.
Sunday, 15 July 2012
Nikon P510 - First Trial
I succumbed to a Nikon P510 for one reason - the 1000 mm, 35 mm equivalent. lens. For wildlife photography, mainly video that I take using a Sony HDR-XR550, the longest lens I can manage is 600 mm equivalent and that is with the 1.7x extender. But with the need for speed it is usually impossible to set up a tripod in time to get a shot of a bird that may only be there for a few seconds, so the video is shaky even with vibration reduction, and the subject is tiny even with that length of lens. That's where a still is useful to drop in the video (with the appropriate sound effect of a camera shutter). However, the still capabilities of the Sony are limited (it seems to focus on anything but what you want it to focus on in still mode although it manages more than capably to get it right in video) and 600 mm is still the maximum. Hence the Nikon P510 (which also has high-definition video). I know it does not do raw, I know its small sensor will be noisy if the gain (ASA setting) is increased very much. But that 1000 mm lens for £304 from Amazon could not be resisted.
I tried the camera immediately I had opened a box and fitted a memory card (the battery came ready charged). I stood outside and photographed the birds on the feeder and on the lawn, tried a few close-ups of flowers (another useful source of cut-aways for travel videos) and downloaded the results into Aperture on my Mac, did the quick fix adjustment and cropped to 16:9 format to simulate what I would get if they were added to a video.
Here are three of the shots:
Pretty impressive - and just what I needed.
I cannot stress how important it is to have something that is light on long journeys in the tropics, and this certainly fills the bill. Of course, it will not replace by Nikon D700 and it is not meant to but so far it looks ideal for the job I wanted it for.
There was only one problem — my wife did not believe it could have been so cheap and so the Amazon invoice was dangled under her nose. The value is actually amazing. Based on retail price index, the price is the same as I paid in 1956 for a Braun Paxina 29 still camera. That was a 6x6 120 roll-film camera with a not very good f2.9 lens and an eight-speed shutter. That was it — no rangefinder, no meter, just three controls to operate (aperture, speed and focus) plus not forgetting to wind on. Based on the rise in wages compared to prices since then, I would only just been out of the box camera price range. I can forgive the plasticky feel of the P510 at its price.
I have now downloaded the manual and will report further.
I tried the camera immediately I had opened a box and fitted a memory card (the battery came ready charged). I stood outside and photographed the birds on the feeder and on the lawn, tried a few close-ups of flowers (another useful source of cut-aways for travel videos) and downloaded the results into Aperture on my Mac, did the quick fix adjustment and cropped to 16:9 format to simulate what I would get if they were added to a video.
Here are three of the shots:
 |
| Bullfinch with sunflower seed. 1/125, f5.9, 180mm (1000 mm equiv), 400 ASA. Hand-held. Cropped to 2547x1431 pixels |
 |
| Chaffinch. 1/250, f5.9, 180mm (1000 mm equiv), 800 ASA. Hand-held. Cropped to 3022x1698 pixels |
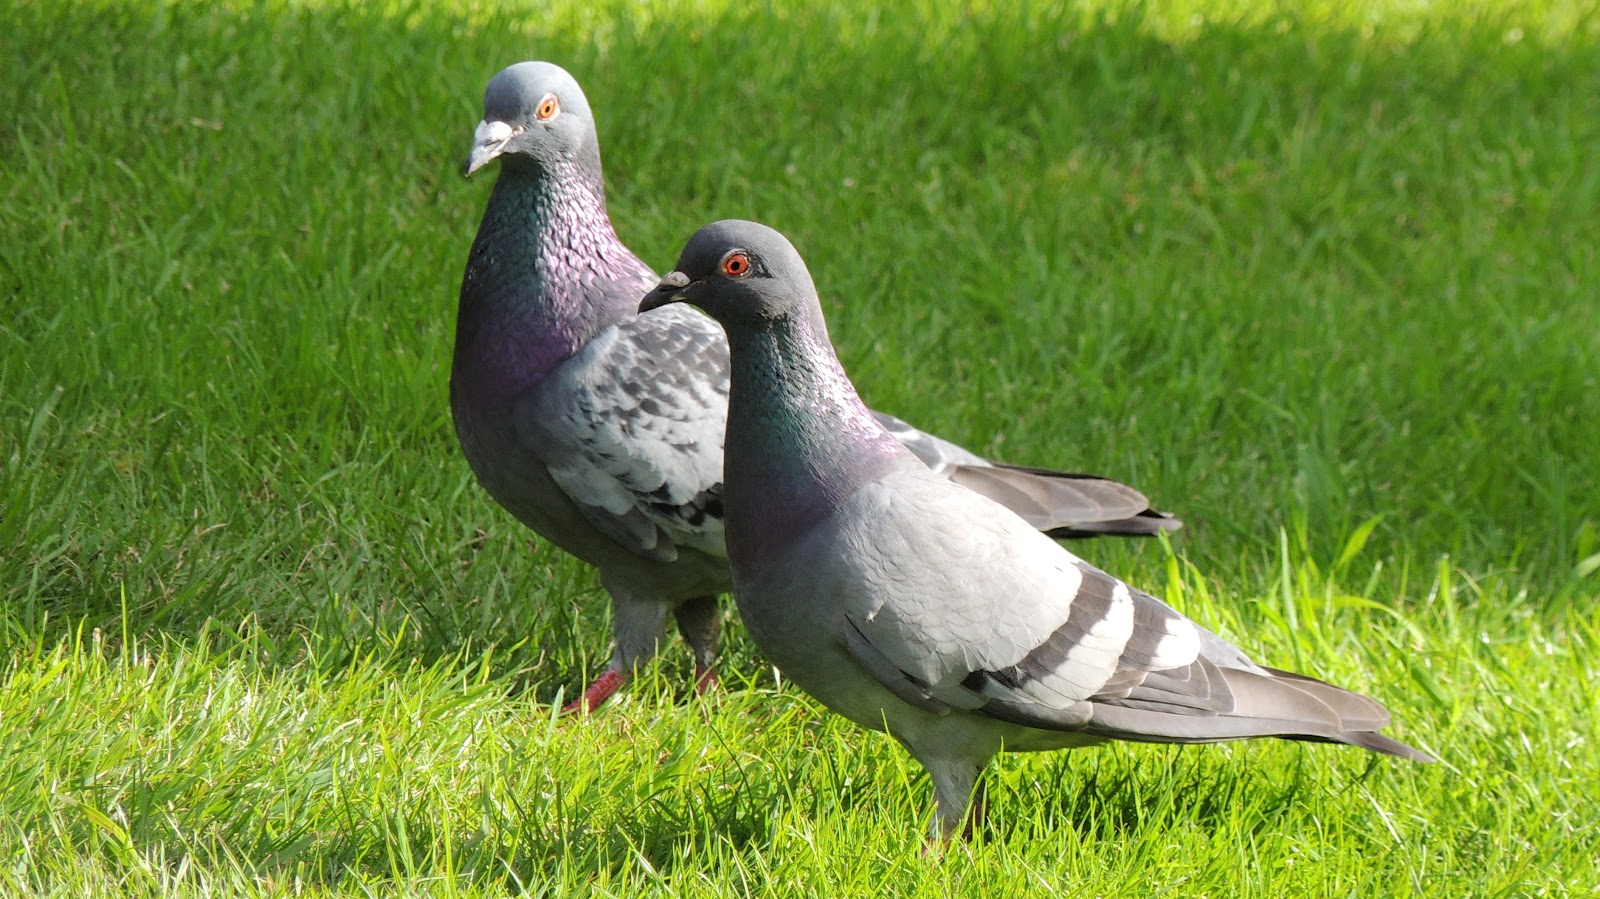 |
| Feral pigeons. 1/250, f4.9, 98mm (545 mm equiv), 160 ASA. Hand-held. Cropped to 3768x2118 pixels |
Pretty impressive - and just what I needed.
I cannot stress how important it is to have something that is light on long journeys in the tropics, and this certainly fills the bill. Of course, it will not replace by Nikon D700 and it is not meant to but so far it looks ideal for the job I wanted it for.
There was only one problem — my wife did not believe it could have been so cheap and so the Amazon invoice was dangled under her nose. The value is actually amazing. Based on retail price index, the price is the same as I paid in 1956 for a Braun Paxina 29 still camera. That was a 6x6 120 roll-film camera with a not very good f2.9 lens and an eight-speed shutter. That was it — no rangefinder, no meter, just three controls to operate (aperture, speed and focus) plus not forgetting to wind on. Based on the rise in wages compared to prices since then, I would only just been out of the box camera price range. I can forgive the plasticky feel of the P510 at its price.
I have now downloaded the manual and will report further.
Tuesday, 3 July 2012
Exakta on eBay
A couple of recent eBay auctions had Exakta bodies and lenses I would once have given my eye teeth for. A Varex IIb with four lenses: Flektogon 35 mm f2.8; Pancolor 50 mm f2; Sonnar 135 mm f4; Schneider-Kreuznach Tele Xenar 200 mm f5.5 plus a set of extension tubes. That lot went for £172.75.
A few days later a Varex went with an Enna Lithagon 35 mm f3.5, a Zeiss Jena 58 mm f1.2 (no name given), a Meyer Trioplan 199 mm f2.8 and a Dallmeyer 6” f5.6 plus a few odds and ends for £139.00.
I wonder whether bidders wanted the lenses for digital cameras, to use with the bodies or as collectors items.
I had an Exakta Varex IIb with f2 Pancolor, pentaprism, extension tubes and the release rod that went with them. I could only afford a cheap 135 mm lens which was unbelievably soft. I made the wrong choice though. The Pentax VX or Spotmatic would have been better. I chose a system that was on its way out in 1966; Pentax was on the way in.
The machining of the extension tubes was pretty crude with sharp edges on the locking levers. Setting up the external linkage between the diaphragm of the lens at the front and the body release at the back was a pain. The tightness of fit of the rings was poor such that when I had a lens on the end it drooped at an alarming angle. Some features of the Varex IIB were useful (the knife for cutting a partly-exposed film - but not for Kodachrome and the like, the left-hand release for a left-hander) but the Pancolor lens I had seemed to lack contrast compared with Japanese lenses of the time and I was not sorry to sell the camera lens and close-up accessories to Campkins in Cambridge.
Tuesday, 26 June 2012
Why No Video?
Why is there no coverage of making moving images in UK photographic magazines? Apart from a mention of the (increasing) video capabilities of cameras in reviews and comments like, clients demand video from professionals, there is nothing. No reviews of video quality, of camcorders, of editing software — nothing. Video is treated as vaguely embarrassing that no real photographer would be interested in. But with more and more people using everything from camera phones to DSLRs, why the omission?
It is not as if coverage of the techniques of film making were not needed. Look at the appalling footage uploaded to Youtube and you will see that even the most basic knowledge is lacking - keep the camera still, don’t zoom unless you have to and so on. After the demise of the devoted video and video editing magazines (which were set up when the technical aspects of capturing and editing video were cutting edge) the photographic magazines have not picked up on the demand from readers. Cinematography has a different language from still so perhaps the magazine editors know nothing about it. But, the publishers are missing a trick somewhere.
Because of the difference in ‘language’ still photography and cine photography have tended to exist in isolation. However, this was not always the case. Amateur Photographer had a section devoted to cine many years ago.
As a still and cine photographer (standard 8 mm, Super 8, H8 video, mini DV and now HD) I see no virtue in excluding video from photographic magazines. Quite the opposite since increasing numbers of consumers are seeing still photography as being second best. Stills of wildlife (including children) no matter how good, just don’t capture the essence of a subject. They lack the fourth dimension of time and that’s where video scores. Most animals move and it is that movement, even over a very short sequence, that, to me, is essential. Even the shortest movie tells me more than a still photograph. After all, nobody would watch a BBC wildlife programme made up of still photographs, would they?
Tuesday, 19 June 2012
Springwatch Binocular Battle 2012
How did the battle of the binoculars on BBC’s Springwatch go this year? I didn’t see all the episodes but it looks as if appearances of Leica, Swarowski and Nikon were pretty well evenly matched. Zeiss had no presence as far as I could see. The marketing men of the various companies must be analysing the appearances of their brand down to the second.
My whole family think Leica still have the edge in the part of the range we favour (8-10 x 32-42). That’s a good job since we could not bear to buy Swarovski and be seen to be associated with those awful glass trinkets they made their name with.
By the way, ever wondered why Swarovskis favour the necks of so many wildlife guides. Wonder no more - special deals are done. Good marketing, which may help explain why that company came from nowhere to take such a dominant role.
Zeiss seemed to lose the plot for a while. They had such a dominant position for decades - all good binoculars were Zeiss. I suppose like many German companies they rested on their laurels for too long. They can’t have been helped by the cheap East German Zeiss Jena range which muddied the brand until German reunification.
Thursday, 14 June 2012
Anti-aliasing: Anti or Pro
The extra ‘sharpness’ (‘crunchy’ as the article described it) from sensors lacking an AAF is is fact an artefact of the sampling systems inherent in digital imaging. The crunchiness may be attractive or judged desirable by some but it is no more a reflection of reality than an over-sharpened photoshop job. We are not being cheated into accepting less of the detail that is there by the manufacturers who fit an AAF; an AAF ensures we see the best representation of the image that is presented to the sensor by the lens. AAFs are expensive to manufacture and no designer is going to add such a costly item to produce what some misguided individuals interpret as a degraded or second-rate image. As the author of the article explains, the fall-off in contrast between features brought about by the necessary but imperfect AAFs, is best corrected during processing by using a sharpening procedure, ‘unsharp mask’ for example.
I have seen the argument advanced (particularly in US-based internet-forums) that because medium-format digital cameras do not use AAFs (and the marketing bumph for such cameras make a virtue of that point) then the lack of an AAF is a desirable feature - the ‘what’s good enough for Hasselblad is good enough for me’ type of argument. Unfortunately, these declaimers fail to realise that medium-format cameras lack an AAF because it is too expensive for manufacturers to include one made to the required size, and that the marketeers have had to make a (false) virtue out of a necessity. Incidentally, Hasselblad must be feeling pretty sore after the comparisons showing their very expensive cameras are outperformed by the Nikon D800.
Nevertheless, some camera manufacturers listen to their customers and, right or wrong, have given the choice of a camera with or without an anti-aliasing filter.
I hesitate to recommend the article by Professor Bob Newman in AP wholeheartedly because while the conclusions he presents are clear, as usual in these articles the technical explanations are abstruse and assume a level of knowledge not possessed by probably 99.9% of readers. That 99.9% includes me and I know something of the work and importance of Shannon and Nyquist. The explanations of the diagrams in this and other articles are very poor. The Editor of AP either needs to allow more space for important articles so that concepts and explanations can be spelt out, or he needs to employ a science writer skilled in taking the bare bones of an article and ensuring that the intended readership can actually follow the argument. Apart from that criticism and suggestion for improvement, AP is to be congratulated for examining such technical matters in digital photography and informing the reader of what marketing material reflects reality and what is hype.
So, would I buy the 800E (lacking an AAF) rather than the 800 as a replacement for my D700. No!
A very useful and gentle debunking of the current fad for cameras with no anti-aliasing filter (AAF) over their sensor appeared in Amateur Photographer (9 June 2012 issue). The fad for no AAF seems to have arisen because some people seem to think they are getting a more accurate representation without an AAF and that the sole purpose of an AAF is to prevent moiré pattern formation. All my reading is that such reasoning is based on a false premise. The article in AP lays out why the arguments for having no AAF are flawed. However, the demand for customers has been such that several manufacturers now make cameras without an AAF, the Nikon D800E for example.
The extra ‘sharpness’ (‘crunchy’ as the article described it) from sensors lacking an AAF is is fact an artefact of the sampling systems inherent in digital imaging. The crunchiness may be attractive or judged desirable by some but it is no more a reflection of reality than an over-sharpened photoshop job. We are not being cheated into accepting less of the detail that is there by the manufacturers who fit an AAF; an AAF ensures we see the best representation of the image that is presented to the sensor by the lens. AAFs are expensive to manufacture and no designer is going to add such a costly item to produce what some misguided individuals interpret as a degraded or second-rate image. As the author of the article explains, the fall-off in contrast between features brought about by the necessary but imperfect AAFs, is best corrected during processing by using a sharpening procedure, ‘unsharp mask’ for example.
I have seen the argument advanced (particularly in US-based internet-forums) that because medium-format digital cameras do not use AAFs (and the marketing bumph for such cameras make a virtue of that point) then the lack of an AAF is a desirable feature - the ‘what’s good enough for Hasselblad is good enough for me’ type of argument. Unfortunately, these declaimers fail to realise that medium-format cameras lack an AAF because it is too expensive for manufacturers to include one made to the required size, and that the marketeers have had to make a (false) virtue out of a necessity. Incidentally, Hasselblad must be feeling pretty sore after the comparisons showing their very expensive cameras are outperformed by the Nikon D800.
Nevertheless, some camera manufacturers listen to their customers and, right or wrong, have given the choice of a camera with or without an anti-aliasing filter.
I hesitate to recommend the article by Professor Bob Newman in AP wholeheartedly because while the conclusions he presents are clear, as usual in these articles the technical explanations are abstruse and assume a level of knowledge not possessed by probably 99.9% of readers. That 99.9% includes me and I know something of the work and importance of Shannon and Nyquist. The explanations of the diagrams in this and other articles are very poor. The Editor of AP either needs to allow more space for important articles so that concepts and explanations can be spelt out, or he needs to employ a science writer skilled in taking the bare bones of an article and ensuring that the intended readership can actually follow the argument. Apart from that criticism and suggestion for improvement, AP is to be congratulated for examining such technical matters in digital photography and informing the reader of what marketing material reflects reality and what is hype.
So, would I buy the 800E (lacking an AAF) rather than the 800 as a replacement for my D700. No!
Subscribe to:
Posts (Atom)