Showing posts with label Infrared. Show all posts

Thursday, 22 February 2018

My current processing workflow for black-and-white infrared photography

I now have a standard protocol (workflow) for producing black-and-white images from my infrared-converted cameras. It is very simple and allows adjustments and corrections at all stages.

In Lightroom Classic, in Basic, I select Black & White then Auto Tone. Then I take the image to Silver EfexPro2. I usually use the preset High Structure Smooth or High Structure Harsh. Then, after making adjustments, I go back to Lightroom to make further general or local adjustments to finish the job, usually leaving noise reduction and sharpening until the end.

Those simple steps suit Raw images from my converted Nikon D80 with a 590 nm filter and my Nikon D7100 with 720 nm filter, or either camera with an 850 nm filter over the lens.

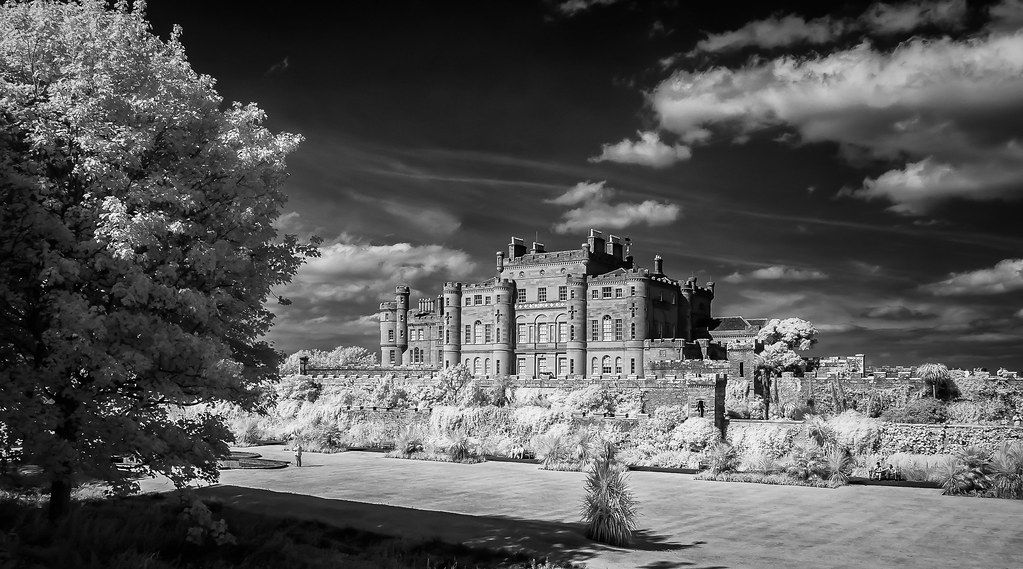
Here, as they say, is one I made earlier:


Culzean Castle

Sunday, 18 February 2018

Infrared Processing in Macphun (Skylum) Luminar 2018

For those photographers not locked into/who don't like the business model/who can't afford the Adobe Lightroom/Photoshop environment, choices for processing images taken with an infrared converted camera have been limited. However, I saw that Macphun's (now Skylum) Luminar 2018 has a Channel Mixer and have been trying it out.

I should also point out that another rival system out there, DXO Photolab also has what they call a channel mixer in its optional extra, FilmPack 5. However, this is for changing the amount of the various channels in a conversion to black-and-white. It cannot be used for faux colour infrared conversion.

The Luminar Channel Mixer 'Filter'
In Luminar, the Channel Mixer works fine and in the same manner to that in Photoshop. For a newcomer to infrared, there is the added advantage that everything can be done to complete the image in this one app. The same cannot be said for Lightroom where a trip to Photoshop (or indeed to Luminar as a plug-in) is required.

A set of presets (which includes a channel mixer stage for faux colours and various black-and-white options) has recently been made available by Laurie Klein Photography for $9.95. I have tried them and they might produce a reasonable starting point for some people but I would find it just as easy to build my own presets using settings for Photoshop devised by Bob Vishneski (see my post of 12 June 2017). The problem with somebody else's presets for infrared is that what you get depends on the filter/sensor combination is in the converted camera.

One slight criticism of Luminar is that when things start getting complicated with lots of filters applied, there is a really noticeable lag from moving a slider to seeing the result appear on screen. That may be a property of my now old Mac but I do not have that problem in Lightroom and/or Photoshop.

For those looking for a different or much cheaper option for faux colour infrared images, Luminar 2018 has a lot to offer.

Monday, 12 June 2017

My current processing workflows for ‘faux’ colour Infrared photography with DSLRs

Readers of this blog will be aware that I have tried all sorts of different software and ways of processing ‘faux’ colour images from infrared-converted cameras. I came across the superb article* by Bob Vishneski here on the photographylife website and found his method to be the best, with a second (which he also describes) as a back up to provide greater flexibility on occasion. Both use Lightroom and Photoshop CC plus Nik Collections Silver EfexPro. Both depend on using RAW images.

At present I have two infrared-converted cameras. The first is a Nikon D7100 with a 720 nm filter; the second is a Nikon D80 with a 590 nm filter. Bob Vishneski makes the point that different camera/infrared filter replacement combinations need different settings. His preset developed for his D7100 with 720 nm filter from Kolarivision works fine with images from my D7100 with 720 nm filter (I do not know who did the conversion). I was able to modify the settings for that preset to use with images from my D80 with 590 nm filter simply by moving the Tint slider.

Because there may be months between sessions of processing infrared photographs I like to keep a note of my current standard methods (‘workflow’ in photography-speak; ‘protocol’ in a laboratory).

Vishneski Preset at Import Method


For those who want to use the Vishneski Preset at Import Method, which uses presets on import into Lightroom I show my protocol and the presets below. I cannot say standard protocol because there are stages in it where the final appearance can be affected and experimentation is possible. I do not describe some of the whys and wherefores, adding ‘structure’ with a luminosity blending mode overlay from Silver Efex Pro, for example because they are covered in the Vishneski article.

Camera Calibration Profile Method


The second method I had used before reading the Vishneski article. The Camera Calibration Profile Method relies on using an Adobe Custom DNG Profile for the camera/filter combination that can be applied in the Camera Calibration section of the Develop module in Lightroom before sending the image to Photoshop for the Channel Mixer stage to be applied. Like Bob Vishneski I found little difference between the two methods for the D7100/720 but that with the D80/590 the Vishneski Preset method (using my own tweaks for that combination) produced better results with ‘cleaner’ colours after the Channel Mixer stage in Photoshop. Using a custom DNG profile does have one advantage: in Lightroom, the white balance can be shifted by the Temperature and Tint sliders or by picking an area on the image to set a white balance (e.g. glass or foliage in sun, grass in shade, tarmac in sun, tarmac in shade etc) with marked effect on the image that emerges after the Channel Mixer stage in Photoshop.

Photoshop Channel Mixer Settings


Bob Vishneski has published two Photoshop Channel Mixer settings (shown below). The second one is here; I will not deal with the rest of that second article here suffice it to say that I have tried both of his and compared them with the traditional simple red-blue channel swap. I use what I have called his Type 1 channel mix for the D80/590 combination using both methods in Lightroom (results are better than the conventional swap and the Type 2 channel mix) and the Type 2 mix for the D7100/720 combination, again for both the Preset at Import Method and for the Camera Calibration Profile Method. I have all these Channel Mixer Settings set up as Actions in Photoshop along with the addition of a (Auto) Curves and Hue/Saturation Adjustment Layers.

Workflows


Here are my Workflows or Protocols for the two methods:


Presets for the Preset at Import Method


Preset for my converted D7100-720 nm IR Filter

Preset for my converted  D80-590 nm Filter

*It is worth reading (and ignoring some of the inane) comments at the end of the article.

Saturday, 7 May 2016

Infrared 'faux colour' video from an IR-converted (590 nm) DSLR and Final Cut Pro X

I do not have a video camera that has been converted for infrared with a 590 nm ('goldie') filter. I do though have a Nikon D80 so converted and could investigate the effect of channel swapping in Final Cut Pro X and the plugins described in my previous post using still photographs on the video timeline.

As you can see, as with my 720 nm-converted Nikon D7100, the process works very well, again proving just as easy, if not easier, than using the various methods available for still images only.

The Nikon D80 produces a noiser image than the D7100, so I also used the Neat Video noise reduction plugin for FCP X. The latter is excellent although rendering is very slow indeed.

Still image from 590 nm-infrared converted Nikon D80 processed in Final Cut Pro X as described in previous post. No noise reduction applied
As above with noise reduction (Neat Video) applied

I am not just planning to use the Nikon D80 with the 590 nm filter conversion for still photographs dropped into a video. Being able to produce the 'faux' colour effects in Final Cut Pro X means that I can take time lapse sequences and after making simple corrections, like dealing with dust spots, on all the images in Lightroom, and compiling the sequence into a video, I can do all colour channel swapping and colour grading in FCP X.

Tuesday, 26 April 2016

Infrared 'faux colour' video from an IR-converted (720 nm) DSLR and Final Cut Pro X

Shortly after my new-to-me infrared-converted (720 nm filter) Nikon D7100 arrived the week before last, I realised that I could try to make 'faux colour' infrared full hd videos. However, I had no idea whether with the software available I could process the footage. A day or two later a spell of wall to wall sunshine arrived and so I wandered down to the Auld Brig o'Doon and stuck my camera over the wall just to get some footage to import in Final Cut Pro X. In the interests of health and safety I did stand well away from the carriageway just in case a drunk came by on a horse pursued by witches who gather at intervals at Alloway's Auld Kirk.

Safely back home, I imported the footage into FCPX and found that converting the footage was actually easier than doing the same job with still photographs using the widely-known techniques and which I have written about at length in previous posts.

I have had installed for some time the excellent and free colour effects plugins produced by Alex Gollner (Alex4d). Included in that bundle is Channel Mixer a4d and with that plugin the red and blue channels can be reversed to produce the blue sky effect. Very soon I had worked out a protocol that worked best for me, with the proviso, of course, that other settings and effects could be applied to produced a whole range of 'looks' in the final output.

To explain what I have been up to I have made a short video which explains the steps in Final Cut Pro X:


I shall not repeat the procedure here but there are a couple of things to point out. Whoever converted the camera for the previous owner managed to set a custom white balance. The raw footage has that white balance applied. Others have found it extremely difficult to set a custom white balance in an infrared-converted D7100, and I have not yet found a way. The 'Balance Colour' first step of the conversion process is, therefore, on footage being taken with the custom white balance. Without a custom white balance, (i.e. white balance on 'auto' on the camera) I cannot get reasonable colour using the Channel Mixer; in these circumastances 'Balance Colour' does a reasonable job to bring the white balance back in line but not quite a good enough one. Therefore, a custom white balance set as advised for the particular IR filter on the sensor would appear to be essential.

I should also point out that my experience is confined to infrared-converted cameras, and does not extend to those uncoverted cameras with an infrared filter attached to the lens.

Friday, 12 February 2016

Fisheye Lens for Suitable for Infrared Photography: Kelda 6.5 mm f/3.5

From ePhotozine
I have been looking for a fisheye lens for infrared photography. I found it difficult to find out which fisheye lenses, if any, show a ‘hotspot, and I was reluctant to buy a second-hand Nikon or one of the still relatively expensive ones from the second-line manufacturers.

A couple of weeks ago I saw in ePhotozine that Kauser International were offering a Kelda 6.5 mm f/3.5 fisheye for APS-sized DSLR sensors for £129. Now, I am usually very wary of buying a cheap lens. The reviews of most reveal poor optical performance. However, the earlier review in ePhotozine of this lens showed it to be remarkably good at f/8 and f/5.6. I then found that this lens is or has been sold by a number of companies, some in slightly different configurations, starting, it seems with Samyang and described either as 6.5 or 8 mm focal length. Although Samyang appear to make their lenses in Korea, the Kelda is described as made in China. 

I ordered one (with a Nikon mount) on the grounds that if it proved not to be suitable for infrared, then I had lost very little. It arrived from Kauser virtually by return. It looks like the early model Samyang. The fact that it is manual focus with a manual aperture ring is no hardship. I was impressed by the build quality: a solid feel, smooth focusing ring and half-stop clicked aperture ring. The supplied plastic front lens cap has a faux spatter-coated sheet metal look. On this model the petal lens hood seems to be fixed (well, I can find no way to remove it and the plastic flange extends below the front element of the lens) even though the box states that it is removable.

The first test was my usual shot out of the window lens test. The weather has been so foul and so dull that a meaningful test was out of the question. However, at first glance I could see no sign of a dreaded hotspot. Yesterday, however, the weather was fine, and on the way back from the post office I stuck the lens (attached to my 590 nm infrared converted Nikon D80) into the Auld Kirk to check that it really was suitable for infrared. As you can see from the following Lightroom, Photoshop and Viveza-processed shots, there was no sign of a hotspot.


Reviewers of this lens in it various guises have commented, hardly surprisingly, on the flare when shooting against the light. With this lens’s coverage of 180° on the diagonal of the sensor, it is hard to avoid getting the sun (or one’s own shadow) in the frame. Reviewers have also marked the lens down for its lack of a depth-of-field scale. With the enormous depth of field of this lens (whether it is nominally 6.5 or 8 mm focal length), that absence, together with the absence of an infrared focus mark, is completely irrelevant. At f/8, the hyperfocal distance is about 30 cm which means that when focused at that mark, everything is in focus from the end of a six inch rule to infinity.

The Samyang fisheye lens family to which this version clearly belongs is noted for the stereographic projection of the image. The advantages of this projection over others are shown here.

In conclusion, I have a fisheye lens that works for infrared with an optical performance (ePhotozine used Imatest) that hits excellent between f/5.6 and f/11 with minimal chromatic aberration at f/11. I would rate this lens at the price I paid as a bargain. So far, so very good.
Saturday, 31 October 2015

‘Deep’ Infrared photography using a 850 nm filter over the lens of a 720 nm or other converted DSLR: Handheld Shots

The one drawback of using an 850 nm filter over the lens of a DSLR converted with a filter of a lower cut-off (e.g. 720 or 590 nm) is that the viewfinder is completely dark. On a tripod it is an easy matter to align the camera, screw the filter in place, and adjust the exposure.

With later Nikon DSLRs models, like the D90, the solution to using the camera off the tripod is easy: use Liveview, However, ready-converted Nikon D70s and D80s are popular in UK especially for those trying infrared photography for the first time. With no Liveview it would seem there is no way that they could be used with an 850 nm filter for hand-held photographs. But there is a way: put a cheap direct vision finder of the type used for rangefinder cameras in the accessory shoe and use that to line up the shot when the filter is in place—not to frame the shot necessarily but to align the camera to the central point already identified without the filter in place.

The procedure then is simple: Without the 850 nm filter, frame the shot through the normal reflex finder and remember where the central point of the photograph lies in the scene (easy with a central focus point showing in the finder); add the filter and then with the direct finder aim the centre of that finder at the spot identified earlier, and take the photograph.

Provided you aim for the centre it does not matter what focal length the direct vision finder is simulating, although it does help if the frame of a longer focal length lens is outlined. To reiterate the finder is being used as a direction indicator or gunsight, not as a means of framing the shot. This method works, of course, for all manner of zoom and fixed focal length lenses since the frame shown is of no concern.


The photographs show a brightline finder fitted to a Nikon D80. The central point is easy to see because of the marking for a 135 mm focal length lens (on what it was designed for, a full-frame 35 mm camera). Incidentally, I do not recommend the finder shown (Helios, made in Japan); a poorer article it would be hard to imagine since it was poor in both design and construction. I got this some time ago from an eBay seller but only got round to using it more recently. The first thing I noticed was the name ring seem misplaced but then I saw that the frame were moving around inside the finder. I took it apart. It had been crudely glued but the non-original as well as the original adhesive had come unstuck so that the frame (on a piece of film and glued between two bits of glass) was rattling about. Fastening it back in so that the centre of the view was at the centre of the frames was not easy since there was no fixed point for attachment. I assume the factory must have had some sort of jig to drop the film-glass sandwich onto drops of glue. I put the whole thing back together, aligning the frames by eye, and it does now align with the centre of the proper viewfinder (at what is effectively infinity) pretty well spot on.


Thursday, 24 September 2015

‘Deep’ Infrared photography using a 850 nm filter over the lens of a 720 nm converted camera

I have repeated the trials I did with an 850 nm filter on my 590 nm-converted Nikon D80 with my new-to-me 720 nm-converted D90. I needed to increase the exposure by two stops compared with the value metered by the camera without the filter in place; as before I had to do this on manual because metering through the filter produced nonsensical results.

Tuesday, 4 August 2015

‘Deep’ Infrared photography using a 850 nm filter over the lens of a 590 nm converted camera

For black-and-white infrared photography I wanted to get darker blue skies and whiter foliage than I could using my converted Nikons with 590 and 720 nm filters over the sensor. So I bought a cheap 850 nm filter to fit over the lens. The grand total of £19.99 paid to an eBay seller soon had a made-in-China Zomei 77mm 850 nm filter arriving by post.

The only disadvantage of this route to ‘deep’ infrared photographs (actually ‘near’ infrared to physicists) is the opacity of the filter. You have to work with a tripod, frame the shot and then screw the filter onto the lens before pressing the shutter. Since I will use it for non-moving subjects the addition of the filter is only a slight inconvenience.

First of all I checked what exposure I would need compared with the exposure metered by the camera without the filter. I soon found that with the filter in place my 590 nm-converted camera on aperture priority over-exposed by about 6 stops, as you would expect since the meter is working somewhere in the visible light range. Kolarivision suggest a light loss of about 1 stop with their 850 nm filter. Sure enough, when I made a series of test shots at 1/3rd stop intervals in sunlight, 1 stop over the metered exposure was the best. However, 1 stop is the starting point for adjustment up or down depending on the amount of infrared radiation relative to the amount of visible light coming from the scene.

I keep my 590 nm-converted camera at minus 2/3rd stop (-0.7) exposure compensation (slightly less than suggested by Kolarivision for their 590 nm conversions). For convenience when using the  850 nm filter I now turn compensation to 0, take the metered reading on aperture priority, switch to manual exposure and add 1 stop. I also focus manually before adding the filter.


The two photographs, from my usual test site of out of the bedroom window, below show black-and-white conversions in Lightroom from my 590 nm converted Nikon without and with the 850 filter.


Tuesday, 28 July 2015

Infrared Processing in Lightroom

If you have your RAW image from an infrared converted camera in Lightroom, having to go to Photoshop or Photoshop Elements with Elements+ to swap the red and blue channels is a pain. When I made the move from Aperture to Lightroom 6, I was delighted to find, in a Google search, Jarno Heikkinen’s solution to the problem on his Capture Monkey website. His download provides Camera Calibration Profiles with reversed colour matrices for a number of cameras. To reiterate, it simply extends the profiles available within Lightroom. It does not, of course, work for jpegs.

I also remembered that Jason O'Dell had described an approach similar to, but easier than, changing Hue in Nikon Capture 2 using Viveza 2 (I have Nik Software as a plug-in for Lightroom).

I thought I would compare the basic conversions using these three methods. The starting point was a NEF image from a converted Nikon D80 with a 590 nm filter over the sensor.

As you can see there are differences from the same raw image. All I have done is to apply the conversion and then in Lightroom use Auto Tone. I have not done any further processing.

A Lightroom 6 to Photoshop Elements with Elements+. Red/Blue Channel Swap. Auto Tone in Lightroom

B Lightroom 6. Camera Calibration Profile Red/Blue Swap (Jamo Heikkinen). Auto Tone in Lightroom

C Lightroom 6. Edit in Viveza 2. Near 180 degree shift in Hue. Auto Tone in Lightroom


I then did a simple black-and-white conversion within Lightroom and these are the results:


Which method you prefer depends on the final look you are trying to achieve and how easy it is to get where you want to be. Each provides the starting point for further processing both in colour and black-and-white. For most purposes, particularly black-and-white, and at the moment I think I can manage with the wholly within Lightroom solution of Jarno Heikkinen, although for some faux colour images I rather like the Viveza 2 process. Whether or not I can manage completely without the channel swapping step in Photoshop time will tell as I try images with the different cut-off filters over the sensors of my converted cameras, with different white balance settings, with additional external filters and with different lighting.

How to—and how NOT to—get started in Digital infrared Photography

First rule: do not start with magazine articles such as those that have appeared in Amateur Photographer. Even a reader of the natural home of the head-in-sand luddite wrote to complain how misleading one article had been.

Second rule: Use the information available on the internet. It is far better than anything I have seen in a magazine both on taking and processing infrared images.

Third rule: Do not simply buy an IR filter and try it on an unconverted camera. The sensors of many cameras have virtually no sensitivity to the infrared end of the spectrum.

Fourth rule: To get started buy an infra-red converted Nikon D80 or D70 for £120-200 from the many available on eBay UK. You will pay much much less than the price of a conversion. This route has been completely ignored by the magazines. Could it to protect their advertisers? Also check which Nikon lenses are suitable for infrared since some show ‘hotspots’ on the image. Canon bodies—if you are that persuasion—are also available but less commonly than the old Nikons. Again check on websites which lenses are not suitable. The advantage of the old DSLRs over many converted compact cameras (also freely available on eBay) is that they offer RAW rather than just JPEG output, thereby offering greater opportunities for processing.

Fifth rule: If you do not want to pay for the full version of Photoshop to do channel swapping, use Photoshop Elements and buy Elements+ for US$12 which unlocks that capability.

These are some of the websites I found to be particularly useful in getting me started:

Lifepixel  and Kolarivision (good advice and guidance on their own conversions, filters and processing). Also this tutorial guide.

There are many other websites but some which were useful in the past are now out-of-date.


Thursday, 23 October 2014

Infrared photography with a point-and-shoot Panasonic Lumix DMC-FH27

On trying digital infrared photography for the first time I bought on eBay a simple IR-converted point-and-shoot camera, a Panasonic Lumix DMC-FH27. In some ways it was an easy and fairly cheap means of seeing what was possible. For example, custom white balance is very easy to set. I found a lens hotspot at the wide end (5 mm) of the zoom but that disappeared at longer focal lengths). The biggest problem is noise. Within the sky or clouds, there is very marked noise even at the lowest ISO settings. In fact, the noise is so bad that attempts to change the hue of a particular colour chosen by the eye-dropper tool often failed and all efforts to apply colour control points in Nik software failed miserably. Moreover, the colour rendition of foliage was not what I had expected.

I should, of course, have read the Kolari Vision website before I bought it. This is what it says:

Most Panasonic cameras take photos with a more saturated, distinctive blue color. Their flash tends to mess up the custom white balance, and some high resolution sensors can have a distinct noise pattern. Another thing to note with these cameras is that the 590nm and 665nm filters tend to come out stranger, with the leaves being more red than yellow, and skies becoming somewhat green.

I then moved on to IR-converted DSLRs and my FH27 has been put aside with the hope it would fit in my pocket when shooting video or normal photographs so that I did not have to carry several heavy camera bodies.


A couple of weeks ago I it caught my eye and I wondered if I could find some way of overcoming the processing problems I had encountered earlier. I thought I would try, as a first step, to reduce the noise. This I did using Nik’s Dfine 2 (Aperture plug-in), first applying the basic, global adjustment and then using control points to either increase or decrease the noise (the latter when I wanted to retain detail). Then, I returned to Aperture and took the image to Photoshop Elements/Elements+ to swap the red and blue channels. I also added a hue/saturation adjustment layer to shift the overall hue as necessary. Then back to Aperture and Viveza 2 where I hoped I would be able to use control points as well as global levels and curves adjustment. I could and was, therefore, able to process images to achieve the ‘look’ I wanted, using the full panoply of controls available. A return to Aperture and then a visit to Sharpener Pro 3 where I applied only sharpening to control points where I wanted to see crisper detail. Global sharpening was not applied in order to retain the noise reduction I had obtained at the first step.
Screen grab from the loupe in Dfine 2 showing before
and after global noise reduction
That is the workflow or standard protocol I am applying to the jpgs from the FH27 (no raws on this camera alas).

Some of the older websites describing infrared techniques I found did suggest that for some small cameras noise reduction might be necessary to satisfy those photographers who did not think noise added to the atmosphere of infrared images. They suggested Neat Image, for example, which I have used to good effect for scanned prints on textured paper (post 22 December 2013). However, noise reduction software that offers local control rather than a simple global coverage is of a great advantage for the present application. Dfine 2, offers local control points and colour ranges to obtain selective noise reduction. By using Dfine 2 for the first step, I have been able, after that, to follow my standard workflow used for images from my Nikon DSLRs (16 October 2014).

A before and after sky area from a processed image showing the noise reduction
So would I recommend the FH27 as an infrared-converted camera? I cannot say that I would. A converted Nikon D70 or D80 body can be bought for not that much more and the small sensor with a large number of pixels (the pixel density of the Lumix is 24x that of the Nikon D80) is probably just too small to get really good low-noise IR photographs. Exposing at the red-end of the spectrum exacerbates noise for the reasons explained here. However, I am now able to say that shots can be processed to get much better results than might be expected from my early efforts and the amount of noise generated.

A colour version of a test image manipulated using control points in Viveza 2
A black-and-white conversion of the same image in Silver Efex Pro
The jpg produced by the camera
A quick shot between showers last weekend with white balance set on grass in sunlight a few seconds before
I could not make local adjustments with this level of noise
After global and local adjustments in Define 2, Viveza 2 and Sharpener Pro 3
The enlarged images of noise before and after shown above are from these images
Ignore the subject (I didn't want to get wet getting something more photogenic and the manipulation achieved. This is just to show the sort of effect I can now get from an almost infinite range of global and local adjustments


Thursday, 16 October 2014

Infrared Colour Conversion: A Workflow in the Mac using Aperture, Photoshop Elements plus Elements+, and Nik Software

As followers of this blog may realise, I have been playing with infra-red converted cameras over the past year. I have been trying to achieve a protocol or workflow that includes the channel mixer step to swap the red and blue channels as well as to provide local as well as local control over what appears in the final image.

Over the past few weeks, urged on by the acquisition via eBay of a 590 nm cut-off filter in a Nikon D80, I came up with the following protocol. Last year I bought a 715 nm-converted D70. The 590 nm is the ‘Super Color’ filter of Lifepixel; the 715 nm is the ‘Standard IR Filter’. Incidentally, for those wanting to get into colour infra-red photography, the videos on the  Lifepixel website are the best I have come across.

The protocol is not perfect because it does not move the original raw files between applications and the channel swapping is done at 8 bits, not 16.

The starting point is a raw NEF file in Aperture 3. This workflow uses Aperture to store and stack the converted images. However, since Aperture will not be supported by Apple in the foreseeable future, it is important to note that no essential steps are taken in Aperture.

In Aperture Preferences, export files are set to PSD with Photoshop Elements as the External Editor (TIFFs could also be used). Nik Collection’s Viveza 2 and Sharpener Pro 3 Output Sharpening are plug-ins from Aperture.

I am not giving details of what I do within each piece of software. Topics like channel-swapping and how to use Nik software control points are very well covered elsewhere.

The raw file is imported into Aperture. This is what it looks like:


No Adjustments are made to the image in Aperture. Using ‘edit with Adobe Photoshop Elements.’ the image then opens in Photoshop Elements with Elements+ incorporated. That’s where the red and blue channels are swapped. After saving and replacing the image that arrived in Elements, the channel-swapped image arrives back in Aperture alongside and in the stack of the original version. This is what it looks like at that stage:


Then, using ‘edit with plug-in’, the image is opened in Viveza 2. There, the world is your oyster because the level of control is immense. I first do global adjustments using mainly the Levels and Curves panel. I then make control points to control the colour, saturation, brightness and contrast  of individual areas. For example, I can make the foliage colour more golden (from the 590 nm filter) or I can desaturate it completely to white. Nik’s U-point technology really comes into its own for sort sort of work. I then press Save and the image reappears in Aperture.

In Aperture I using the retouching tool to take out any minor imperfections. A bird, for example, in the distance may look like a black speck.

The I sharpen the image, either in Aperture or in Sharpener Pro 3 Output Sharpening, accessed again as a plug-in. Sharpening the whole image can bring unwanted texture into the sky, for example. However, control points can be set to then reduce that added sharpening in the sky. Indeed, the sky can be de-sharpened independently so far that the image can be made to appear as if a long exposure was used with the edges of the clouds merged into the sky. After pressing Save, the image again appears back in Aperture.

Finally, I straighten and crop the image if necessary in Aperture.

This is what the output can looked out, bearing in mind that a very wide range of ‘looks’ is possible from a basic infra-red end of the spectrum image.


So that, for the moment at least and until I come up with something better, is my standard protocol.

Monday, 6 October 2014

Infrared camera conversions and channel swapping. Can files be processed in the new Nikon Capture NX-D?

With Nikon Capture NX-2 now discontinued, I had heard dire rumours of the very much downgraded but free ‘replacement’ Nikon Capture NX-D. Gone have those features like Control Points that made Capture NX-2 such a powerful bit of software. I was keen to find out if NX-D could be used for infrared colour conversion like NX-2 from cameras, like my old D70, having a suitable filter over the sensor (mine has a 715 nm filter).

At this stage I should say that I have two methods of ‘channel swapping’ on my iMac. The first is via the channel mixer in the add-on application to Photoshop Elements, Elements+. I do that step from Aperture with Elements selected as the external photos editor. I also add a hue adjustment layer there, adjust the R,G and B channels if necessary and then go back to Aperture for the final editing.

My second method is the one involving Capture NX-2. I use Catapult to move the files to and from NX-2 (see my post of 25 August 2012). The reason for using this method is that I found that I could get different appearances from the same initial image.

The method I use in NX-2 was described by Jeff Meyers in a post on the Nikonians website. You can follow the link to see his full description but the key part—equivalent to channel swapping in Photoshop—are these steps:

4. Now, here's the cool part. Click on the "New Step" button. Select "Color" and then "LCH" from the pull down menus.

5. Click on the pull down menu that says "Master Lightness" and choose "Hue." That will bring up a colored hue box. Below the box there's another pull down menu. Click that and select 180. Notice that the hues have all slanted.

6. Go to the triangular slider on the right side of the box. Slide it about two-thirds of the way up until the red and blue channels are switched. Watch your image. You'll want to experiment with the best place to put that slider. The red sky has now become blue.


So, can you do that in Capture NX-D? The answer is yes. Here are screen grabs showing the appearance of the control before and after swapping the channels; with the latter the sky has turned blue. With my filter and white balance I move the slider on the right all the way to the top.


I have found something odd with NX-D that prevents the straightforward use of Catapult between it and Aperture. If you right click on a raw Nikon image and choose Open With, NX-D does not appear (NX2 does). If you then force that by choosing All Applications from the box, a message appears stating that the file format is not recognised by Capture NX-D. That is rubbish because by choosing the same file from within NX-D, the file is recognised. 

I think it is for this reason that Catapult cannot open NX-D as it can NX-2. However, in coming up with the error message when trying to export to NX-D from the latest version of Catapult the image usually appears in NX-D anyway!

Catapult uses a scratch folder with two folders within it: Drop Folder and Pickup Folder.

From Aperture with the image selected, I choose Photos - ‘edit with plug-in’ - Catapult

In the Catapult box’s upper (export) panel I untick the ‘open with’ box but leave Drop to as Drop Folder. I then press Export, then Done which quits Catapult.


In NX-D I then open the file from Drop Box, do the necessary editing and then save it to the Pickup Folder as a tif jpg (BUT not the raw nef). In Aperture, selecting the same image as before, I again choose: Photos - ‘edit with plug-in’ - Catapult. This time I import the edited image from Catapult to Aperture. Catapult adds that version to the stack for that image and places them together.


There is no doubt that NX-D is a major downgrade from NX-2 shows how careless Nikon have been again with their software and its customer base, many of whom have not forgotten the desertion of their software for Nikon scanners.

There are all sorts of things I want to try in NX-D, like batch processing. However, although it can be used for infrared processing, sadly lacking are the Control Points of NX-2. However, for those with an infrared-converted camera, processing is possible with the free NX-D. The full Photoshop or Elements plus Elements+ are not necessary for the channel-swapping stage. However, NX-D would still not be my preferred editing software for infrared conversions. I find Aperture and the Elements/Elements+ combination much easier to use and the attraction of control points has gone. However, there are other possible combinations I have to try and should I no longer be able to use Capture NX-2 either as operating systems are upgraded or cameras appear which aren’t covered for raw files, I shall still have several ways of getting the look I want from photographs taken with different IR filters.

I am now left with concern over how much of a downgrade Apple Photos will be as a replacement for Aperture 3…but that’s for the future.

Added Note: I have found that White Balance can be changed in NX-D by using the grey point method (as in NX-2) so that the result using the LCH, Hue 180 etc step can be modified by going back to changing the grey point in white balance, just as in NX-2.